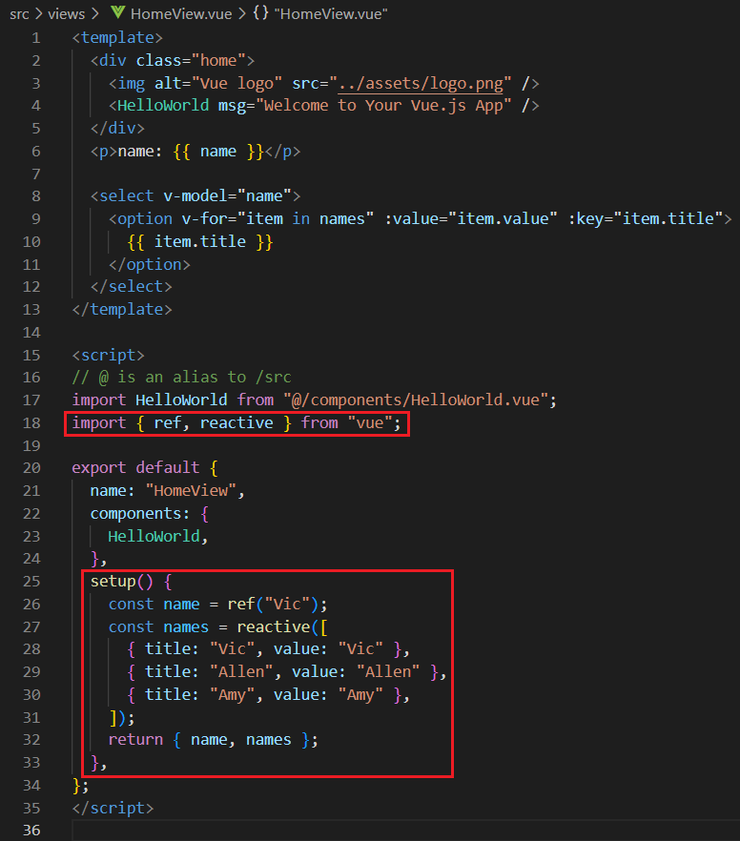
續上篇,那是Vue 2 Options API的舊寫法,這邊改成用Vue 3 Composition API的寫法:
Vue2:

Vue3 setup() / ref / reactive

...
import { ref, reactive } from "vue";
...
setup() {
  const name = ref("Vic");
  const names = reactive([
    { title: "Vic", value: "Vic" },
    { title: "Allen", value: "Allen" },
    { title: "Amy", value: "Amy" },
  ]);
  return { name, names };
}
...
- Composition API可以直接在setup()裡面定義data跟method,簡潔許多。
- setup() 就等於Vue2生命週期的beforeCreate、created。
- Vue2 destroyed = Vue3 onUnmounted。
reactive跟ref的差別
L27其實也可以用ref來定義,reactive跟ref的差別:- ref: 不限資料型態,不會對 Object 或 Array 內部的屬性做監聽,存取資料需要.value。
- reactive: 只能是Object或Array資料型態,可以做深層監聽,存取資料不需要.value。
#關於存取資料需不需要.value,可看這個範例:


#關於監聽的部分,可以看下面的範例:


這邊可以發現,只有name2 ref: 這個console沒有print出來,原因跟上述的一樣,因為ref不會對 Object 或 Array 內部的屬性做監聽,所以雖然事實上值的確改變了,但是watch不到,也就不會有print log。
所以如果資料型態是Object or Array,而且希望value改變的時候可以watch的到,就可以使用reactive。
使用axios抓取資料
在DOM 渲染完成後,使用axios打API拿資料,可以用onMounted method,使用axios可選擇CDN或本地安裝:
$ npm install axios假設後端api url與資料如下:


import { ref, reactive, onMounted } from "vue";
import axios from "axios";
onMounted(() => {
  axios
  .get("http://localhost/redis/public/api/order")
  .then(function (response) {
    console.log(response);
    name.value = response.data.message;
  })
  .catch(function (error) {
    console.log(error);
  });
});
then中的response console log如下:

common function
可以直接設計一個.js檔案,裡面可以直接寫script,computed是在count資料改變時再做計算。

import { ref, computed } from "vue";

export default function () {
  const count = ref(0);
  const double = computed(function(){
    return count.value * 2
  });
  function increment() {
    count.value++;
  }
  return {
    count,
    double,
    increment,
  };
}
使用時直接import,可以直接存取變數, function等等,這邊直接讓按鈕click的時候觸發increment function。

import Counter from "@/utils/Counter.js";
const { count, double, increment } = Counter();
一開始count跟double都是0,按第一下按鈕:

按第二下按鈕:

props
- 用來將父元件的資料傳遞給子元件。
- 父元件:

- 子元件:
L8用來定義外部傳來的props,L9 setup()第一個參數即是props。


如上,如果是字串不需要加「v-bind:」或簡寫「:」,如果是其他type則需要加,否則都會變成是字串型態:
- 有加v-bind:


- 沒加v-bind:


- v-bind可省略,以下兩者寫法一樣意思:
v-bind:parent-msg
:parent-msg
emit
- 用來將子元件的事件與資料傳遞給父元件。
- 父元件:
@testButtonClick用來當子元件emit testButtonClick時,要呼叫onTestButtonClick function。

- 子元件:
當click test button會觸發testButtonSelfClick function,當emit testButtonClick,則會呼叫父元件的onTestButtonClick function,並將參數帶過去。
L8用來定義emits,與父元件的@testButtonClick是對應的,L12則是真正emit out 父層。

- test button click結果:

本筆記參考:
1. https://ithelp.ithome.com.tw/articles/10259305
2. https://medium.com/web-design-zone/%E5%9C%A8vue-js%E4%B8%AD%E4%BD%BF%E7%94%A8axios%E5%8F%96%E5%BE%97%E8%B3%87%E6%96%99-8db6aec9157d
3. https://www.tpisoftware.com/tpu/articleDetails/2530
4. https://ithelp.ithome.com.tw/articles/10278236
5. https://www.tpisoftware.com/tpu/articleDetails/2459
6. https://ithelp.ithome.com.tw/articles/10223518
7. https://stackoverflow.com/questions/64605807/vuejs-3-emit-event-from-child-to-parent-component


