NI官方論壇有一則貼文發佈了手動安裝LINX的流程
可以讓Pi 2B, Pi 3A+, Pi 3B, Pi 3B+, Pi 4...等等都可以和Labview連上使用的Labview版本也不再限於2014版
首先按正常流程安裝hRaspbian Buster (我在Jessie和stretch試過也沒問題)
把pi連上網路然後到介面設定把SSH, SPI, I2C打開

接著打開terminal, 依次輸入下列指令+
# Add the LINX repository
sudo sh -c 'echo "deb [trusted=yes] http://feeds.labviewmakerhub.com/debian/ binary/" >> /etc/apt/sources.list'
sudo apt-get update
# Install the LINX package. Error messages will be displayed for the
# nisysserver.service and labview.service
sudo apt-get install -y lvrt-schroot
# Move the nisysserver.service and labview.service files to the systemctl folder
sudo mv /etc/systemd/system/multi-user.target.wants/nisysserver.service /lib/systemd/system
sudo mv /etc/systemd/system/multi-user.target.wants/labview.service /lib/systemd/system
# link liblinxdevice.so to the Raspberry PI device driver file liblinxdevice_rpi2.so
sudo schroot -c labview -d /usr/lib -- ln -s liblinxdevice_rpi2.so liblinxdevice.so
# Enable the nisysserver.service and labview.service to start on boot
sudo systemctl enable nisysserver.service
sudo systemctl enable labview.service
# Start the nisysserver.service and labview.service
sudo systemctl start nisysserver.service
sudo systemctl start labview.service
一開始把LINX加入資料庫的指令,必須注意 binary/前的空格是必要的
如果打錯就必須 到參照檔把錯誤及多餘的參照都刪除
sudo nano /etc/apt/sources.list
接著安裝LINX包的時候會看到兩行錯誤訊息, 這是正常的
Failed to start nisysserver.service: Unit nisysserver.service not found.
Failed to start labview.service: Unit labview.service not found.
接下來h幾行指令是把這兩個檔案移到正確位置並建立連結及啟動
完成後樹莓派不用重開機就可以被Labview連到
Makerhub官方的寫的那個開啟sample VI的方法在這邊是不能用的
必須自己去建立連結
Labview要和樹莓派建立連結要從Project建立一個在樹莓派之下的VI
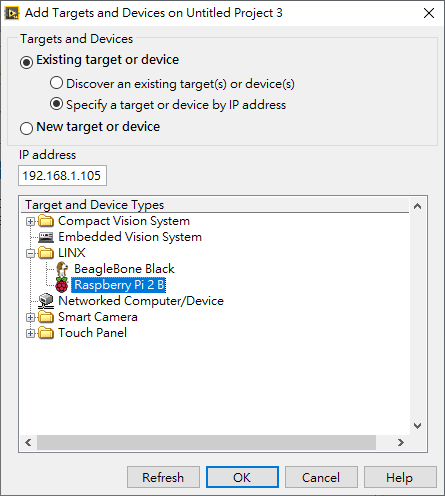
具體流程如下: 1.在Project按右鍵建立新的Device

2. 選擇用IP指定已存在的裝置, 可以看到LINX裡樹莓派只能選2B, 但其實沒差
3.可以看到樹莓派右下是h綠燈代表有連上, 驚嘆號是沒連到
在樹莓派按右鍵, 新增要佈署到樹莓派的VI

4. 接著按照下面的Snippet把LED開關程式完成並儲存VI, 這邊注意DO channel用的是BOARD編號
如果DO=7代表LED正極要接到板子的第7根PIN

5.按下程式執行鍵後會開始佈署, 完成後就可以用click me按鈕控制樹莓派上的LED


