想讓 Stable Diffusion 算圖更細膩精緻?本文分享兩個實用技巧,輕鬆實現細節控制,讓你的圖片從粗糙到精緻,質感大升級!
本文將介紹這兩種方法的原理與步驟,只要掌握他們,就可以隨意輕鬆調整細節,讓我們立刻開始吧!
目錄
比較方式
為了比較兩種方法輸出結果的差異,以下用三種情境測試,分別是擬真人像、擬真靜物、和繪畫風格。並把三種情境的圖片當作原圖丟入 img2img 作測試,調整參數輸出不同權重的結果。
以下是他們的原圖
擬真人像

擬真靜物

繪畫風格

法一:ControlNet – Tile Resample
ControlNet 官方 github 解釋 Tile Resample Model 的行為:
- Ignore the details in an image and generate new details.
- Ignore global prompts if local tile semantics and prompts mismatch, and guide diffusion with local context.
白話文的意思就是,此模型:
- 會參考給定圖片重新繪圖,圖片構圖、大方向內容不會改變,但細節部分會重新生成
- 繪圖時,要是文字 prompt 和圖片內容發生衝突,以圖片內容為優先
因此我們可以利用這個特性,將想要增加細節的圖片丟到 ControlNet Tile Resample 中,透過調整 img2img 的 Denoising strength 參數控制 AI 自由度,決定要增加的細節多寡。
理論解釋完,我們立刻來實驗看看:
將圖片放到 img2img 的 Source Image 區

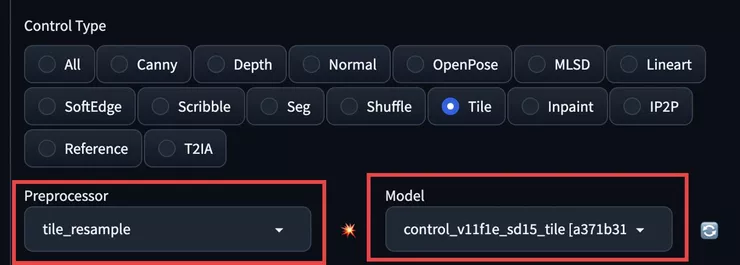
往下找到 ControlNet 區塊,把圖片也拖到 ControlNet 的 Source Image 並勾選 Enable 以及 Pixel Perfect

下方勾選 Tile ,WebUI 會自動幫你選擇
- Preprocessor :
tile_resample - Model:
control_v11f1e_sd15_tile

如果還沒有 Model 的朋友們,請先到 ControlNet 1.1 的 Hugging Face 下載 control_v11f1e_sd15_tile.pth
和
control_v11f1e_sd15_tile.yaml
兩個檔案,放到
stable-diffusion-webui/extensions/sd-webui-controlnet/models
之中,回到 WebUI ,點一下 ControlNet Model 下拉選單旁的 Reload 按鈕,就可以選到他了!

回到 img2img 上方,其中 Sampling method、Sample steps 等等參數各位可以自由調整,我們主要專注在 Denoising stength 參數上

調整 Denoising stength 數值
- 越大,ControlNet 算圖補充的細節愈多
- 反之,補充的程度越少
因此可依此參數控制細節補充程度。
馬上來看看測試結果!.....
👉👉前往 如何讓 Stable Diffusion 算圖更真實? | ControlNet Tile Resample | Detail Tweaker LoRA 閱讀全文
延伸閱讀
如何用 Stable Diffusion + ControlNet 向外擴展圖片?| Outpainting
兩階段解決 Stable Diffusion 臉崩問題
如何用 Stable Diffusion 產生高解析度的圖?
最詳細的 Stable diffusion WebUI 操作教學 – txt2img


