👨💻簡介
terraform在每次執行terraform plan或terraform apply時,是如何知道應該要管理哪些資源?
terraform.state這份狀態檔,預設檔案使用JSON格式。假設建立一個google cloud storage的resource,tf設定檔如下:
resource "google_storage_bucket" "bucket" {
  name                        = "terraform-alan-test-bucket"
  location                    = "ASIA-EAST1"
  storage_class               = "STANDARD"
  public_access_prevention    = "enforced"
  force_destroy               = true
  uniform_bucket_level_access = true
}
建立後的terraform.tfstate的一小部分如下:
{
  "version": 4,
  "terraform_version": "1.5.7",
  "serial": 3,
  "lineage": "abda0fda-b807-b8b3-0a36-8b0c2f92e3f5",
  "outputs": {},
  "resources": [
    {
      "module": "module.base-bucket",
      "mode": "managed",
      "type": "google_storage_bucket",
      "name": "bucket",
      "provider": "module.base-bucket.provider[\"registry.terraform.io/hashicorp/google\"]",
      "instances": [
        {
          "schema_version": 1,
          "attributes": {
            "autoclass": [],
            "cors": [],
            "custom_placement_config": [],
            "default_event_based_hold": false,
            "effective_labels": {},
            "encryption": [],
            "force_destroy": true,
            "id": "terraform-alan-test-bucket",
            "labels": null,
            "lifecycle_rule": [],
            "location": "ASIA-EAST1",
            "logging": [],
            "name": "terraform-alan-test-bucket",
			}
        }
      ]
    }
  ]
}
可以看到id的屬性,當每次執行plan或是apply時,terraform就是拿這個屬性從本地terraform設定檔與雲上資源做比對。
如果你的terraform用在個人專案,則將狀態檔存在本機即可;不過如果是一個團隊要使用terraform,則可能會遇到幾個問題:
- 狀態檔需要共用:需要確保團隊成員都能正常存取相同的terraform狀態檔。
- 鎖定狀態檔:需要確保團隊成員使用terraform進行操作時,只有一人能對狀態檔做修改,否則可能會因為多個terraform進程對狀態檔做併發更新,導致資料丟失或是狀態檔損壞。
要解決上述問題,常見的做法是將狀態檔進行版本控制(git),但因為某些原因,將狀態檔進行版控並不是一個好想法。有底下幾個原因:
- 手動操作錯誤:有時候可能在操作terraform時,忘記拉取最新狀態檔,或是在執行完terraform後,忘記將狀態檔更新到版控。可能團隊成員使用到舊的狀態檔導致資源回滾。
- 鎖定問題:多數的版本控制系統沒提供任何形式的鎖定,防止兩個團隊成員同時對同一份狀態檔執行操作。
- 加密:terraform狀態檔的資料預設都是以明文形式儲存。但某些資源需要儲存敏感資料,像是資料庫創建時需要建立初始化使用者以及密碼,這些資料不應該以明文的形式儲存在版本控制。
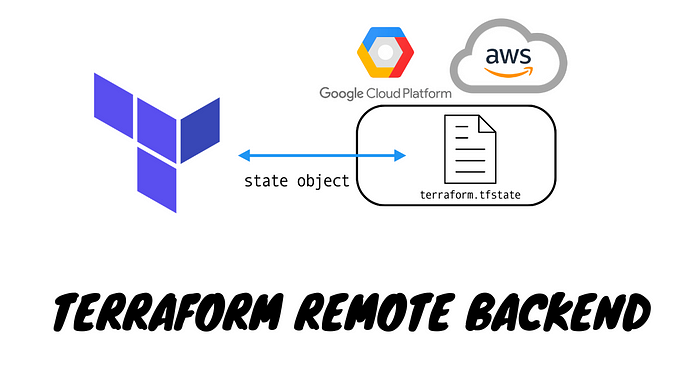
因為以上原因,terraform官方推出 remote backend的支援,可以將狀態檔儲存在所使用的雲平台,而不是使用版本控制,而remote backend解決了剛才列出的三個問題:
- 手動操作錯誤:terraform每次運行時會自動從 remote backend 載入狀態檔,並且每次運行後都會自動將狀態檔儲存在 remote backend,解決了手動操作錯誤。
- 鎖定問題:大多數 remote backend 都支援鎖定。運行terraform時會自動將檔案進行上鎖,確保只會有一人進行操作。
- 加密:大多數 remote backend 都支援狀態檔的傳輸中加密和靜態加密。
使用gcp平台推薦使用 google cloud storage,整理的原因如下:
- 這是託管服務,不需部署和管理額外基礎設施即可使用。
- gcs旨在實現99.99%的持久性和年度耐用性。
- gcs支援加密,預設使用server side encrypt,另外也可使用ckms服務
- 支援版本控制
- 費用便宜,使用免費額度即可滿足需求。
GCP GCS作為terraform remote backend
要使用 Google cloud stroage作為 terraform remote backend,首先是先建立 gcs bucket。 在新資料夾中建立一個provider.tf檔案
terraform {
  required_providers {
    google = {
      source  = "hashicorp/google"
      version = ">=4.0"
    }
  }
}

provider "google" {
  region  ="asia-east1"
}
接著再建立一個名為bucket.tf檔案,使用 google_storage_bucket resource 建立 gcs bucket。
resource "google_storage_bucket" "bucket" {
  name                        = "terraform-alan-test-bucket"
  location                    = "ASIA-EAST1"
  storage_class               = "STANDARD"
  public_access_prevention    = "enforced"
  force_destroy               = false
  uniform_bucket_level_access = true
}
參數說明如下:
name:定義 gcs bucket 名稱location:指定 bucket 儲存位置storage_class:指定 bucket 儲存類型public_access_prevention:設定公開存取防止策略,enforce表示不允許公開訪問force_destroy:設定是否可強制刪除uniform_bucket_level_access:設定是否啟用統一訪問控制
當執行完terraform init以及 terraform apply部署完後,就會看到gcs已經建立完成。但目前狀態檔還是儲存在本地。要將狀態檔儲存到 gcs bucket,需要再額外設定 remote backend,語法如下:
terraform {
  backend "<BACKEND_NAME>" {
    [CONFIG...]
  }
}
其中 BACKEND_NAME是要使用的資源,CONFIG是對這個後端的參數設定。以下是 gcs bucket的後端設定:
terraform {
  backend "gcs" {
    bucket  = "terraform-alan-test-bucket"
    prefix  = "bucket-state"
  }
}
參數說明如下:
bucket:要使用的bucket name,這邊填入剛剛建立的 bucketprefix:定義狀態檔的路徑和名稱,以上述為例,狀態檔會被存放在bucket-state資料夾
要將狀態檔儲存到 gcs ,只需要重新執行 terraform init 指令。該指令不僅可以下載 provider code,還可以設定 terraform backend。此外,init的指令是冪等的,多次執行可以確保每次都是預期的行為。
> terraform init
Initializing the backend...
Do you want to copy existing state to the new backend?
  Pre-existing state was found while migrating the previous "local" backend to the
  newly configured "gcs" backend. No existing state was found in the newly
  configured "gcs" backend. Do you want to copy this state to the new "gcs"
  backend? Enter "yes" to copy and "no" to start with an empty state.
  Enter a value:
執行後terraform會自動檢查本地已有的狀態檔,並跳出提示說要將狀態檔複製到 gcs backend。如果輸入 yes,則會看到以下內容:
Successfully configured the backend "gcs"! Terraform will automatically
use this backend unless the backend configuration changes.
Initializing modules...
Initializing provider plugins...
- Reusing previous version of hashicorp/google from the dependency lock file
- Using previously-installed hashicorp/google v5.3.0
Terraform has been successfully initialized!
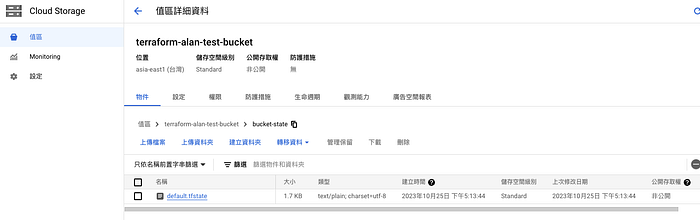
執行完畢後可以到 gcs查看狀態檔是否已經儲存上去。
如果之後有資源使用一樣的backend,terraform執行時就會自動從這個 gcs拉取最新的狀態,並且執行後會自動將最新狀態推送到這個 gcs。
當有兩人同時執行時,則第二個人會出現以下訊息:
> terraform plan
Acquiring state lock. This may take a few moments...
╷
│ Error: Error acquiring the state lock
│
│ Error message: writing
│ "gs://terraform-alan-test-bucket/bucket-state/default.tflock" failed:
│ googleapi: Error 412: At least one of the pre-conditions you specified did not
│ hold., conditionNotMet
│ Lock Info:
│   ID:        1698225515771180
│   Path:      gs://terraform-alan-test-bucket/bucket-state/default.tflock
│   Operation: OperationTypeApply
│   Who:       alan_wang
│   Version:   1.5.7
│   Created:   2023-10-25 09:18:35.490893 +0000 UTC
│   Info:
│
│
│ Terraform acquires a state lock to protect the state from being written
│ by multiple users at the same time. Please resolve the issue above and try
│ again. For most commands, you can disable locking with the "-lock=false"
│ flag, but this is not recommended.
這也確保了執行只會有一人,其他人要操作都會被擋下來。
AWS S3作為terraform remote backend
依照慣例先來個 provider.tf起手式
terraform {
  required_providers {
    aws = {
      source = "hashicorp/aws"
      version = "5.22.0"
    }
  }
}

provider "aws" {
  alias  = "ap-east-1"
  region = "ap-east-1"
}
接著建立一個名為bucket.tf檔案
resource "aws_s3_bucket" "terraform_state" {
  bucket = "terraform-alan-test-bucket"
  provider = aws.ap-east-1
  force_destroy = false
  # Prevent accidental deletion of this S3 bucket
  lifecycle {
    prevent_destroy = true
  }
}
參數說明如下:
bucket:定義 s3 bucket 名稱provider:指定 bucket 儲存位置force_destroy:設定是否可強制刪除prevent_destroy:任何嘗試刪除該資源的操作都將導致terraform退出並顯示錯誤。
接下來要替s3增加一些額外的保護
首先新增版本控制,使用aws_s3_bucket_versioning resource開啟版本控制,確保每次更新都會創建新版。當出現問題時也能恢復成舊版:
resource "aws_s3_bucket_versioning" "enabled" {
  bucket = aws_s3_bucket.terraform_state.id
  versioning_configuration {
    status = "Enabled"
  }
}
參數說明如下:
bucket:要啟用版本控制的 S3 bucket 的 IDversioning_configuration:status:可用選項為Enabled、Disabled與Suspended,設為 “Enabled” 表示啟用版本控制
接著開啟加密設定,使用 aws_s3_bucket_server_side_encryption_configuration,開啟後寫入到這個 S3 的所有資料都會啟用 server 端的加密。確保狀態檔以及任何存在 S3 的敏感資料都在硬碟上加密:
resource "aws_s3_bucket_server_side_encryption_configuration" "server_side_encryption" {
  bucket = aws_s3_bucket.terraform_state.id

  rule {
      apply_server_side_encryption_by_default {
        sse_algorithm = "AES256"
      }
    }
  }
參數說明如下:
bucket:要啟用版本控制的 S3 bucket 的 IDapply_server_side_encryption_by_default:指定預設的 server 端加密設定。sse_algorithm:設定 server 端加密算法,這裡使用的是 “AES256”。
補充一下其他可用選項
- AES256 (SSE-S3):
- 描述:使用 Amazon S3 托管的密鑰(SSE-S3)進行加密。
- 算法:AES-256。
- 密鑰管理:由 Amazon S3 自動處理。
2. aws:kms (SSE-KMS):
- 描述:使用 AWS Key Management Service (KMS) 托管的 CMK(客戶主密鑰)進行加密。
- 算法:通常是 AES-256,但具體取決於 KMS。
- 密鑰管理:由 AWS KMS 處理,允許更細緻的控制和審計跟踪。
3. aws:kms:dsse (SSE-KMS with Double-Wrap):
- 描述:這是一種特殊的 KMS 加密方法,其中數據首先使用一個隨機數據加密密鑰 (DEK) 進行加密,然後 DEK 本身使用 KMS CMK 進行加密,從而實現雙重加密。
- 密鑰管理:由 AWS KMS 處理。
區別:
- 密鑰管理:
AES256由 S3 自動管理,aws:kms和aws:kms:dsse允許更多的控制和稽核,由 AWS KMS 處理。 - 加密強度:
aws:kms:dsse提供雙重加密,可提供更高的安全性。
推薦:
- 對於大多數使用者,AES256 是一個簡單且安全的選擇。
- 如果需要更細緻的密鑰管理、審計或控制,則推薦使用 aws:kms。
- 如果需要更高的安全性和加密強度,則可以考慮使用 aws:kms:dsse,但請注意,這可能會增加一些複雜性和成本。
如果開啟 aws:kms 時,推薦也需要設定 bucket_key_enabled,可減少對 kms請求,降低成本。 當使用SSE-KMS進行 server 端加密時,每次S3對象操作都會導致KMS請求,這可能會增加成本。使用S3 Bucket Keys,可以減少這些請求,從而減少成本。
審計:系統性的檢查和評估過程,用於確定某些標準、政策、法規或其他準則是否被遵循。
第三個設定是存取權的控制,阻止對 S3 bucket 的所有公開存取。
resource "aws_s3_bucket_public_access_block" "public_access" {
  bucket                  = aws_s3_bucket.bucket.id
  block_public_acls       = true
  block_public_policy     = true
  ignore_public_acls      = true
  restrict_public_buckets = true
}
參數說明如下:
bucket:要設定公開存取阻止的 S3 bucket ID。block_public_acls:設定為true阻止公開 ACL。block_public_policy:設定為true阻止公開策略。ignore_public_acls:設定為true忽略公開 ACL。restrict_public_buckets:設定為true限制公開 bucket。
最後一個要設定的是用來當作鎖的 DynamoDB table,使用 aws_dynamodb_table 的強一制性讀取和條件寫入,達到分散式鎖系統。
resource "aws_dynamodb_table" "terraform_locks" {
  name           = var.dynamodb_table_name
  billing_mode   = "PAY_PER_REQUEST"
  hash_key       = "LockID"
  attribute {
    name = "LockID"
    type = "S"
  }
}
參數說明如下:
name:這是 DynamoDB 表的名稱。billing_mode:這指定了計費模式,能使用的值有PROVISIONED與PAY_PER_REQUEST,這裡使用"PAY_PER_REQUEST",依照需請求計費。另一種則是確定有固定的讀寫,則可以設定讀寫量。
hash_key:這是表的主鍵名稱。attribute:name:這是屬性的名稱,這裡是 “LockID”type:這是屬性的類型,可以用的類型有S(字串)、N(數字)、B(二進制)
依照上面的設定,即可完成s3以及dynamodb的建立,一樣下 terraform init terraform apply完成建置。接著來設定 remote backend
terraform {
  backend "s3" {
    bucket         = "terraform-alan-test-bucket"
    key            = "bucket-state/terraform.tfstate"
    region         = "ap-east-1"
    dynamodb_table = "terraform-locks"
    encrypt        = true
  }
}
參數說明如下:
bucket:要使用的bucket name,這邊填入剛剛建立的 bucketkey:要建立在 s3 的路徑和名稱region:指定 s3 的區域dynamodb_table:用來儲存狀態檔的鎖定,防止多人同時使用 terraform 操作同一份檔案,可防止同時修改,避免數據不一致encrypt:決定是否加密 terraform state 檔案,設定為true將使用 s3 的 sse 進行加密prefix:定義狀態檔的路徑和名稱,以上述為例,狀態檔會被存放在bucket-state資料夾
一樣重下 terraform init 重設 backend
> terraform init
Initializing the backend...
Do you want to copy existing state to the new backend?
  Pre-existing state was found while migrating the previous "local" backend to the
  newly configured "s3" backend. No existing state was found in the newly
  configured "s3" backend. Do you want to copy this state to the new "s3"
  backend? Enter "yes" to copy and "no" to start with an empty state.
  Enter a value:
執行後terraform會自動檢查本地已有的狀態檔,並跳出提示說要將狀態檔複製到 gcs backend。如果輸入 yes,則會看到以下內容:
Successfully configured the backend "s3"! Terraform will automatically
use this backend unless the backend configuration changes.
Initializing modules...
Initializing provider plugins...
- Reusing previous version of hashicorp/aws from the dependency lock file
- Using previously-installed hashicorp/aws v5.22.0
Terraform has been successfully initialized!
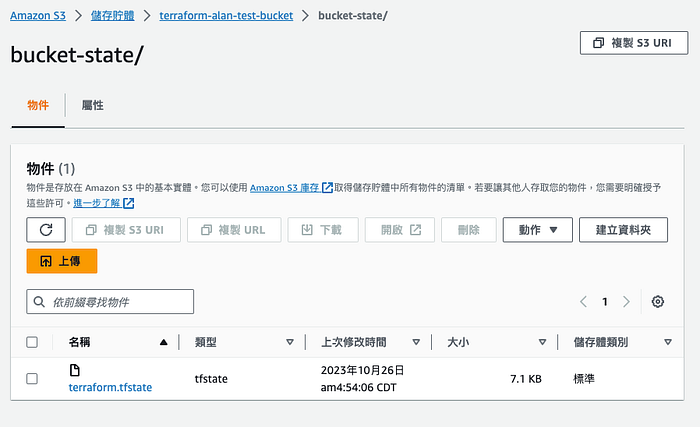
一樣執行完畢後上去 s3 看一下狀態檔是否已經儲存上去
當有兩人同時執行時,則第二個人會出現以下訊息:
> terraform apply
Acquiring state lock. This may take a few moments...
╷
│ Error: Error acquiring the state lock
│
│ Error message: ConditionalCheckFailedException: The conditional request failed
│ Lock Info:
│   ID:        46f562fd-ab59-a657-6984-5e164ec4bf
│   Path:      terraform-alan-test-bucket/bucket-state/terraform.tfstate
│   Operation: OperationTypeApply
│   Who:       alan_wang@Alan-wangdeMacBook-Pro.local
│   Version:   1.5.7
│   Created:   2023-10-26 09:33:34.15838 +0000 UTC
│   Info:
│
│
│ Terraform acquires a state lock to protect the state from being written
│ by multiple users at the same time. Please resolve the issue above and try
│ again. For most commands, you can disable locking with the "-lock=false"
│ flag, but this is not recommended.
╵


