
New Zealand — Deer Park Heights Queenstown
一開始拿了一個 WWDC21 年的 demo 來敘述資料競爭的潛在問題,因為這 app 有三個 concurrent queue 在執行(Main queue, Background queue and Arbitrary queue),他們會交錯使用,很容就產生 data races。

我們的目標就是要轉成,Main actor 控制 View 及主要的 Coffee model,而原本的一些背景操作,會改成專用的 Actor(Coffee data store 和 Health Kit controller),其餘的使用 thread-safe 的 value type,再加上 async/await 來互相溝通傳遞,這樣的架構就安全許多。

但有些情境,還是會使用 reference type,例如 Health Kit Controller 的資料與 Coffee data store 共享,這 model 在兩個 Actor 同時訪問共享狀態,就很容易出現潛在問題,data races。

這時就是使用 Swift 6 的時機了,全面的資料隔離 (Data Isolation),讓 compiler 可以防止在不同任務和 Actor 之間出現這類意外的狀態共享
When to migrate to Swift 6
- You’re experiencing hard-to-reproduce crashes
有些難以重現的 bug,很有可能就是 data races 的問題
- You’re integrating more concurrency into your app
假如已經使用大量的 concurrency 在專案裡,也建議升級,避免引發新的 data races 風險
- You’re maintaining a library that is used from concurrent code
若是開發維護 public source code,可以儘早升級,讓廣大的社群受益,可以參考 swiftpackageindex.com
How to migrate to Swift 6
Steps to enable
- Enable complete checking
這是一個檢查機制,可以先讓 project 繼續使用 Swift 5,但會使用 warning 警告,哪些不符合 Swift 6 的 enforced data isolation,等修復這些 warning 完成後再啟動 Swift 6
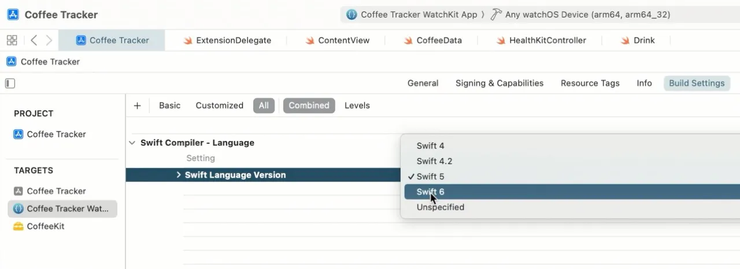
- Enable Swift 6
- Audit unsafe opt-outs
Tip: Do not try to do significant refactoring (like migrating to Swift concurrency) AND enabling data-race safety at the same time. Go one at a time. 建議不要一次就大規模重構和實現 data race safety,一次僅嘗試執行一個操作 ,例如一次就一個 target 調整
首先啟動 Strict Concurrency Checking,在 Build Settings → 搜尋欄 concurrency

啟動後專案就會開始出現一些 warning
Fixing Common Issues
接下來介紹3種常見情況
1. Global Variables
最容易 data races 的地方

通常有幾種方式解決,這個 Logger 已經遵守 Sendable 了
- 只需要把它改成
let,最簡單也最適合 - 但假設這個值後續會變更,就無法使用
let,這時可以選擇標記成@MainActor,讓 compiler 知道他只會在 main thread 上使用 - 最逼不得已的做法,標示成
nonisolated(unsafe),向 compiler 說這個變數在 concurrency 下是安全的,compiler 就不會再檢查了。所以除了很明確且別無他法在使用,否則建議能不用就不用。
Swift 中的 global variables 是 initialized lazily (惰性初始化),首次使用時才初始化,這樣就可以避免啟動時的性能問題,能讓 app 更快速進入可用狀態,這也是與 C 和 Objective-C 相比的大區別,這些語言會再啟動時進行初始化,但是 lazy initialization 也有 races 的問題,但好險在 Swift 的 global variables 是以 atomically (原子)的方式建立,所以就算有兩個 thread 同時訪問,只有一個 thread 會對他初始化,另外一個則會等待。
2. Call to main-actor isolated methods
這個 watchExtension 是一個 global instance 的 method,限定在 main actor (isolated),只能在 main thread 上被呼叫,而當前的 function (scheduleBackgroundRefreshTasks) 並不在 main actor 上,也不是 asynchronous 的,所以不能使用標記 async/await 來處理,所以就會被 IDE 視為警告(跨 thread 的調用)。

解法:
- 把這個 function (
scheduleBackgroundRefreshTasks) 加上@MainActor,這樣就解決了,但也要確保呼叫的地方也都在 main actor,如果呼叫的地方不是 main actor,則還是會報錯,這樣就確保所有關聯的地方都是在 main thread 上執行。 在這個範例裡的 callers,一個是WKApplicationDelegate,另一個是 SwiftUI 的 View,兩者都有被標記@MainActor,所以也是@MainActor的scheduleBackgroundRefreshTasks可放心被呼叫。

- 加上
async來處理,最後 caller 在使用await,例如:
func scheduleBackgroundRefreshTasks() async {
    let app = WKApplication.shared()
    // ...
}

// caller
let tasks = await scheduleBackgroundRefreshTasks()
// ...
3. Callbacks without isolation guarantees
有時有些 API 也不一定都在 main thread 上執行,而是相反的,在其他 thread 執行,例如 HealthKit ,在這情況通常需要我們重新調度回正確的 queue or actor,確保 thread safe,假如在這個部分處理不好,就很容易出現 data race,尤其在 main actor 的地方(像是 View) call 一個 nonisolated 的 method (不保證指定 thread)。

影片提供的例子是這樣, caffeinelLevel(at:) 有個 warning,因為不確定他會在哪個 thread 上執行,仔細看這 class Recaffeinater 是有標記 @MainActor ,而這 Delegate method 沒有明確在哪個 thread 上執行。

解法:
- 加上
nonisolated,雖然Recaffeinater是被標記@MainActor,表示他的程式碼只會在 main thread 上執行,但標記nonisolated後,就不會限制了,這樣 compiler 就不會在強制這 method 要在哪個 thread 執行了。 但是,對外是nonisolated的,但對內部 access 了 main actor 的 property,會有其他錯誤顯示,需要手動處理,例如加上Task { @MainActor in ... },將 access 內部 property 調回 main thread 上。extension Recaffeinater: CaffeinceThresholdDelegate {
nonisolated public func caffeineLevel(at level: Double) {
Task { @MainActor in
if level < minimumCaffeine {
// TODO: alert user to drink more coffee!
}
}
}
} - 一樣是有加上
nonisolated的情況,假如很確定會在特定的 actor 上執行,可以用assumelsolated,斷言當前已經**在 main actor 環境,**它不會啟動新的 Task,而會 async 到 main actor 上,表示告訴 Swift 這段程式碼已經在 main actor 上執行,但注意!假如這 function 不是由 main actor 的地方來呼叫,就會直接停下來(就像使用!force wrapper 一個 nil 的東西),及時出現問題,而不是讓 data race 的問題默默的存在,使用nonisolated後,都要由我們自己來確保 thread safe。extension Recaffeinater: CaffeinceThresholdDelegate {
nonisolated public func caffeineLevel(at level: Double) {
MainActor.assumeIsolated {
if level < minimumCaffeine {
// TODO: alert user to drink more coffee!
}
}
}
} - 加上
@preconcurrency,這是一個 Swift 5.7 引入的過渡用的屬性,使用它等同告訴 compiler 該 protocol 的 callback 已經滿足 isolated 要求,並也在執行時增加斷言,假如 caller 沒有在指定的 actor 上呼叫,會觸發斷言來暴露這邊有 data race 的問題,和上面的方式一樣,也要自己確保之後在使用extension Recaffeinater: @preconcurrency CaffeinceThresholdDelegate {
public func caffeineLevel(at level: Double) {
if level < minimumCaffeine {
// TODO: alert user to drink more coffee!
}
}
} - 如果可以的話,直接改這個 Delegate (
CaffeineThresholdDelegate),把它標記成@MainActor,最簡單的方式,但是有時候是用第三方套件,所以沒有那麼好直接去更改。

但在剛剛介紹的 @preconcurrency 以及 nonisolated(unsafe) (待會會介紹)其實都是過渡的工具,讓我們慢慢遷移,不用一次到位。
假設 warning 都處理差不多了,就可以開啟 Swift 6 了
Tackling large numbers of warning
- Resolve simple issues first
- Look for root causes to large numbers of issues
- Try with the latest SDK
Sendable conformance
最後這邊有一個例子,有 CoffeData 它是在 main actor 上執行的,因為他是 SwiftUI 的 ObservableObject ,其中他有一個 function 呼叫了 CoffeDataStore ,而這個 store 則是另外一個 actor,所以很明顯兩個不同的 actor 之間傳遞東西,很容易就有 data race,compiler 就報出 warning。


假如這邊的 Drink 是一個 reference type 很容易就引發潛在的 data race,因為 main actor 和 store actor 同時有權 access 共享的可變狀態。
我們來看看 Drink 的定義,他是一個 value type,而且有很多 let 的 value type property,沒有使用 reference type,這樣的類型可以很安全的跨 thread 傳遞的。

假如他是一個內部(internal) 在使用的 Model,Swift 會自動幫我們把它設定為 Sendable (但也要他都滿足條件才行),代表他在 thread 上可以安全傳遞,但這個例子他是 public 的,Swift 出於 API 穩定性考慮,不會把 public 的類型加上 Sendable ,因此我們要自行手動加上。
加上
Sendable等同保證這型別不會有任何可變狀態 mutable state
我們為 Drink 加上後,又出現另外一個問題, DrinkType 有個 warning,最簡單的做法就是在幫它加上 Sendable ,可是假如它是一個 Objective-C 的類型,或者他就是一個可變狀態(例如 reference type),就要想想怎麼安全的傳遞他

解法
- 選擇不跨 actor 共享此類型的 instance
- 用 copy 的方式傳遞
- 如果確定他不會有 data race 的問題,直接用
nonisolated(unsafe)關鍵字,但記得 這表示告訴 compiler 不用來檢查,以人工的方式保證這不會有 data race 的問題。

透過 Sendable 檢查,我們能安心確定不同 actor 之間傳遞的 instance 不是 value type copy,就是經過同步方式,杜絕了共享 mutable 可變引用的風險。
舊 API CoreLocation
現在很多新的 Swift API 都是用 Concurrency async/await 的方式,但還是有些舊 API,尤其是因為我們要支援低版本的 iOS 裝置,無法直接用最新的 API,例如 CLLocationManagerDelegate ,它沒有被標記成 @MainActor ,所以他的 callback locationManager(_:didUpdateLocations:) 還是 nonisolated 的,這樣假設我們有一個 @MainActor 的物件再接收他的 callback,就會報錯,如下:

雖然 CLLocationManagerDelegate 有個特性,當 CLLocationManager 在哪個 thread 上建立,這 delegate 就會在哪個 thread 上 callback,而我們的例子是用 @MainActor ,所以 delegate 會在 main thread 上執行,而因為這是舊 API 沒有標記 @MainActor ,無法給 compiler 保證,才會報錯
解法和前面的例子很像,我們可以把它標記成 nonisolated 的, 然後加上 MainActor.assumeIsolated {
@MainActor
class LocationDelegate: NSObject, CLLocationManagerDelegate {
		// ...
    nonisolated func locationManager(
        _ manager: CLLocationManager,
        didUpdateLocations locations: [CLLocation]
    ) {
		    // 斷言在這,不用擔心,因為這 class 是 @MainActor 建立的
		    // 代表這 callback 會在 main thread 執行
        MainActor.assumeIsolated {
		        self.currentLocation = locations.last
        }
        // ...
    }
}
假如哪天真的這 delegate 不是在 main thread 上執行,我們這邊用 assumeIsolated 也會發現 data race 的風險出現了。
建議:對於這類明確定義執行 thread 的舊 API,migrate 時可遵循「建立處決定執行處」的原則 - 在哪thread/actor 建立,就在哪 callback。此外盡量早點將 callback 轉回正確的 thread 上,如在 Delegate方法一進入就 DispatchQueue.main.async 回 main thread(若未使用 Actor)。使用 Swift Concurrency,則像上面範例,使用 assumeIsolated 或 Task { @MainActor in ... } 等確保邏輯在正確的 isolated 内執行。
Wrap-up
- Take your time
- Eliminate simple issues first
- Refactor to improve code once Swift 6 is enabled
- See the migration guide for more examples
WWDC21 - Swift concurrency: Update a sample app
swift.org/migration Swift 6 Migration Guide
Summary
- 分 Module 處理:一個一個 target 逐步進行,不要一次全切換到 Swift 6。
- 先處理常見,簡單的問題,例如 global variables,從
var改成let,或者補@MainActor或Sendable,也盡量先處理 UI 層,因為最單純,通常加@MainActor就可以了,在處理其他的。 - 善用過渡的工具,
@preconcurrency和nonisolated(unsafe)等工具來幫助兼容舊程式碼,在迫不得已的地方使用,先讓 project 能編譯,在計劃後續如何處理。
記得升級 Swift 6 之後,就算 compiler 已經沒有其他警告了,還是要測試整個 app,因為有些情況還是會 crash,請參考 Developer Forums
class AppDelegate: NSObject, UIApplicationDelegate {
    func application(_ application: UIApplication, didFinishLaunchingWithOptions launchOptions: [UIApplication.LaunchOptionsKey: Any]?) -> Bool {
		// Swift 6 以下這樣沒事,但用 Swift 6 會 crash
		UNUserNotificationCenter
			.current()
			.requestAuthorization(options: [.alert, .sound, .badge]) { (_, _) in
				// ...
			}

				// 在 Swift 6 之後需要改成 async/await
			Task {
				do {
					let granted = try await UNUserNotificationCenter.current().requestAuthorization(options: [.alert, .sound, .badge])
					print("授權成功:", granted)
				} catch {
					print("授權失敗:", error)
				}
			}

			// 或者像 ATTrackingManager 也是
			Task {
				let status = await ATTrackingManager.requestTrackingAuthorization()
			}
		}
}


