目標
使用自備的 NAS 或者有硬碟空間的同網域電腦分享空間,做為蘋果電腦的 TimeMachine 備份儲存用
以下以 NAS 舉例,一般 Windows 電腦用網路芳鄰分享也行
準備 sparsebundle 映像檔
在 NAS 上創個專門放映像檔的目錄
請按自已的目錄規劃進行,展示如下:
如有必要,使用指令連接網路分享資料夾
~ mount -t smbfs //nas01/share/03.QA/06.TimeMachine/Scott nas_share
使用磁碟工具程式製作映像檔
從啟動台的其他中尋找“磁碟工具程式”

開啟後點擊右上方新增空白映像檔

如上圖設定:
- 名稱跟儲存為可以自行命名
- 格式選取"Mac OS 擴充格式(日誌式)"
- 映像檔格式選取"稀疏的套件磁碟映像檔"
按儲存後約幾秒時間就會把映像檔準備完成
掛載 sparsebundle 映像檔

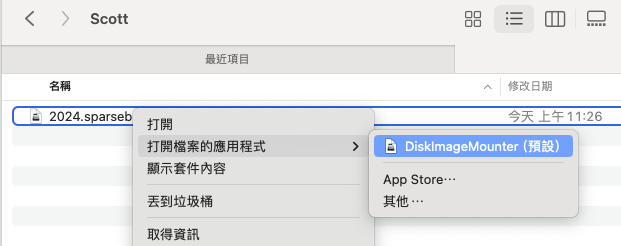
在 Finder NAS 的目錄中找到剛剛創出來的映像檔,滑鼠右鍵點擊後選擇 DiskImageMounter

就可以看到左側的位置清單多出一個項目
設定 TimeMachine 備份位置
下指令指定備份位置
➜  ~ sudo tmutil setdestination /Volumes/2024
Password:
➜  ~
順利完成即可
如遇到權限不足錯誤問題如下:
➜  ~ sudo tmutil setdestination /Volumes/2024
Password:
tmutil: setdestination requires Full Disk Access privileges.
To allow this operation, select Full Disk Access in the Privacy
tab of the Security & Privacy preference pane, and add Terminal
to the list of applications which are allowed Full Disk Access.
請到設定中給予終端機完整權限
步驟:
- 開啟系統設定,左側功能表選到"隱私跟安全性"
- 右側清單中選擇完全取用磁碟
- 按 + 號會展開程式選擇視窗
- 搜尋欄輸入 iTerm 後篩選出 APP
- 按確定,就可以在應用清單中看到剛剛新增的 iTerm
測試效果
開啟 TimeMachine 驗證安裝
從啟動台的其他中尋找“時光機”,點開後看到文件時間流就沒問題了

設定映像檔自動掛載
自動掛載映像檔
設定完後,必須到系統設定的登入項目,加入掛載點,這樣之後重新開機系統也會自動重新連結
參考資料
https://medium.com/letsoffice-archive/不要等到你-mac-死機才看這篇-最強-time-machine-單篇備份教學-348e6e43e4e0
https://www.imore.com/how-use-time-machine-backup-your-mac-windows-shared-folder
https://www.makeuseof.com/tag/turn-nas-windows-share-time-machine-backup/
https://osxdaily.com/2023/02/13/mount-smb-share-command-line-mac/


