UI design has brought us into a whole new stage as Vector Graphics Editors, VGE tools like Sketch(2010), Adobe XD(2016), and Figma(2016) were introduced. The tools not merely bring systems into design, develop modularity with high- efficacy, but allow front-end developers to follow along a more comprehensive Style. Making the process “design to code” unpretentious.
It is the on-going process from design to code. With the ambitious having the efficiency on no-code is then born. Tools mentioned above are compatible with open API, which motion people to develop, and generate projects on design to code. We’ve chosen some tools integrated with Figma to see whether they can realize the ambition on Figma to Code.
1. AWS Amplify Studio
This is the first one we place in test. It is a tool used for connecting front and -backend by AWS Amplify. We can link to Figma file without extra plug-in in Figma by simply signing in AWS Amplify and pasting the specific URL. The platform allows users to turn design components into React component and could be exported and integrated to the database with features set in AWS Amplify. We can perhaps assume Amazon would not only like to make design into front-end interfaces but realize, integrate the solution from start to end to the database.

Since the components are applied as React components, people have to code manually when generating the website. There’s more limits on design in Amplify Studio; smaller components are not allowed like placing buttons in Hero section, they could only be applicable by changing them into component slot, adjust them in the code. In some cases, it is applicable by adding the conditions in properties on RWD- Responsive website design.
Amplify Studio has shared and announced the official plug-in specifically on Figma. It is nonetheless having changes on design tokens and themes. People can change the main and primary colors on design as well as the font sizes (which is not allowed on typography changes), paddings, margins, etc., (error might occur if apply on components other than Amplify UI ) it is quiet similar to the plug-ins in material design.
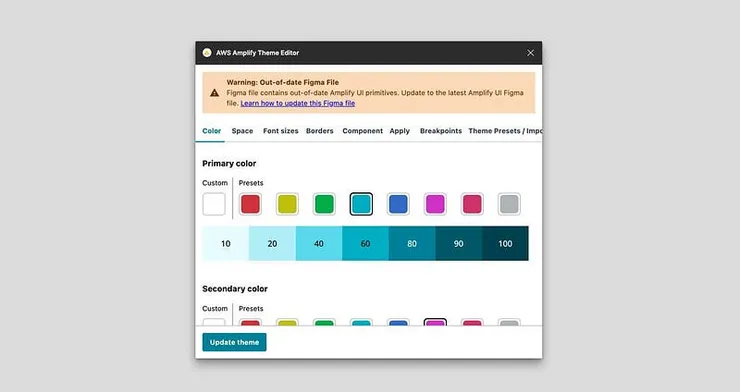
People can read and realize how it works mainly from its official documentation on Amplify Studio. Currently we see not so much related information other than official website. If we’d like to have deeper understanding, we’ve got to get familiar with React, and have some basic knowhow on library frameworks. All in all, you can say Amplify Studio is a tool specifically for front-end developer. Currently, we see only partial design modulation on AWS Amplify Theme Editor interfaces, it might take some time and effort to reach/export a comprehensive/ complete website.

2. Unify

Unify is a plug-in which generates direct React code. We can export/open it with the code sandbox. Like the Amplify Studio, it generates mainly components, we can download or copy the codes to the projects when composing the websites.

Unify generates one component at a time, and will be filtered from bunch of codes when it comes to adjustments (very technical). We’ll put it aside since it is not our current goal.
3. Anima
Anima is a plug-in which generates designs into codes from Figma. Adding new UI for interaction and breakpoints in RWD could be finished in Figma plug-in within clicks. We can see preview with the plugin, which allows us a rapid way testing effects while generating high-fidelity prototypes.

We can choose desired components and adjust them with plug-in Anima in Figma. If we want to have hover effects on buttons, we see slightly bigger buttons set by default. If you have some knowhow in CSS, you can add new properties, like changing the button colors.

Aside from hover effects on buttons, we can place “text input” instead text section, once converting them into HTML, we can have form <input> component.

Upon building RWD, we can have different screen sizes at a time and place the appropriate content for different devices. Anima allows users to import all the click events, animations, and interfaces at a once. We find it very practical, all the components are identical to the components set in Figma, without extra dos.

Anima Plug-in offer interactions, like hover effects for buttons, events for button clicks, text input, and some interaction we see often. But what if we want to enhance the components? Like what if we want to change the color from the input text? If there’s no corresponding section we can click, we can adjust codes to refine it. Anima export our designs into codes for front-end developers. We can choose HTML, React, Vue, etc., different frameworks for adjustments from the exports.

4. TeleportHQ
TeleportHQ allow users to do the final confirmation while converting codes in the compiler. We can use the plug-in to transit codes into compiler into Teleport HQ from Figma, adding interactive components.

We can adjust the components on its visual, position, and status in compiler from TeleportHQ. If we’d like to have advanced adjustment, adjust the values on the panel; we can click advanced for adding properties. Since we can add new tag properties ourselves, it is more flexible on the adjustments before exporting codes.

Upon importing, TeleportHQ allows users to import Color style and Text style at the same time set by default from Figma. We like the feature a lot, many of the interactions could be adjusted in the compiler, like button interactions, we can choose corresponding color style, which not only accelerate the process of the adjustments, but keep the consistency on designs.
We can import color & text style into TeleportHQ compiler
But if you want to use form <input> component, it is necessary to remake in the compiler. Currently it is not possible to convert components into form component directly. However, TeleportHQ allows users to reuse the frequent components , eliminating the duplicated process.

We can use corresponded screen sizes while creating RWD in the compiler. We can import different sizes in UI at a time in Anima, while TeleportHQ allow users to arrange based on the default sizes. Every screen size will be identical on arranging the layers ( It is a lot easier to code and insert conditions compare with the features in Amplify studio.)

TeleportHQ allows users to choose different frameworks while exporting the codes. Difference is, we can adjust and add new tag properties by editing the compiler, after exporting the codes, there’s little amendment in codes. Most of the codes could be adjusted in the compiler within lines. This is way easier.

Auto layout is the way we do on padding and margin, we use property set by default to tackle with the padding and margin in Anima, making them parallel. The first margin property is set by default in TeleportHQ. However, we find it not so practical, we have to adjust every single component by adjusting its margin if new components are applied.

Comparison
Amplify Studio, TeleportHQ and Anima at a glance:

Furthermore, we can export React from Anima and TeleportHQ, we do a comparison to see the differences on export codes by setting the identical design and value.
Anima has bigger file because it exports every RWD layouts and components in Figma into React component; while TeleportHQ allows us to export the content in compiler, they are all in the same file, the design in Figma won’t be exported into component, it is thus smaller. However, when it comes to maintaining codes and its usage, Anima might be a more pratical tool. How we compose and make components is identical like we do in Figma, we can decide how we’d like to bridge designers and developers.
We might think it is easier to use Anima as a whole. In Amina, we can complete the process by clicks, and it’s more intuitive on how Anima exports codes with higher pricing. We can enjoy more features in TeleportHQ as free version and easier while using CSS as property, whereas it takes more time to adjust on RWD. We recommend Anima and TeleportHQ as tools for Figma to Code.
No-code vs. low code
We think no-code is like people aiming for eternal cues; we find it similar as the utopia after some “Figma to code” trials. We can say RWD and Interactivity are the core features in UI design. Whereas Photoshop and After effect allow designers to create works without code, it is another thing.
We focus on what essential skills we need as UI designer. Perhaps we can pause a bit and ponder on questions like, do we need the coding skill? There’s definately bunch of benefits if the designer can code. We’ll share our thoughts with you sometime. Today most of people have access to learn HTML and CSS (of course it would be the adds to have knowledge in frameworks like React, Vue, and Angular). By using Anima and TeleportHQ, we work on low-code for high-fidelity prototypes and websites, we can have more precise interactions, and can have better communication between designers and engineers, sounds good, right?
P.S
Adobe acquired Figma for 20 Billion. We are convinced in the surge on Figma to Code. Will Anima and TeleportHQ stay as privileges and keep enhancing their high-quality features and functions? Will they be replaced by the next big giants? We will see and bring you the latest corresponding shares randomly.
Notes
Below are the links in relation with the tools we set on trials.
Note:
The article is written by Able intern Cheryl Fang, edited by Steven Yeh. Interpreted/Translated by Ching Hsu. Big thanks to Cheryl Fang for all the trials on Figma to code tools mentioned in the article.