事前準備
- 安裝 VirtualBox 虛擬機(在 WIN10 上透過虛擬機安裝 CentOS7)
- 下載 CentOS7 映像檔
- 安裝 Linux 流程可以參考鳥哥私房菜
從3.2.2開始看起就行,鳥哥私房菜安裝流程網址。
安裝 Nginx
在 CentOS 中新建 yum 源並安裝 Nginx
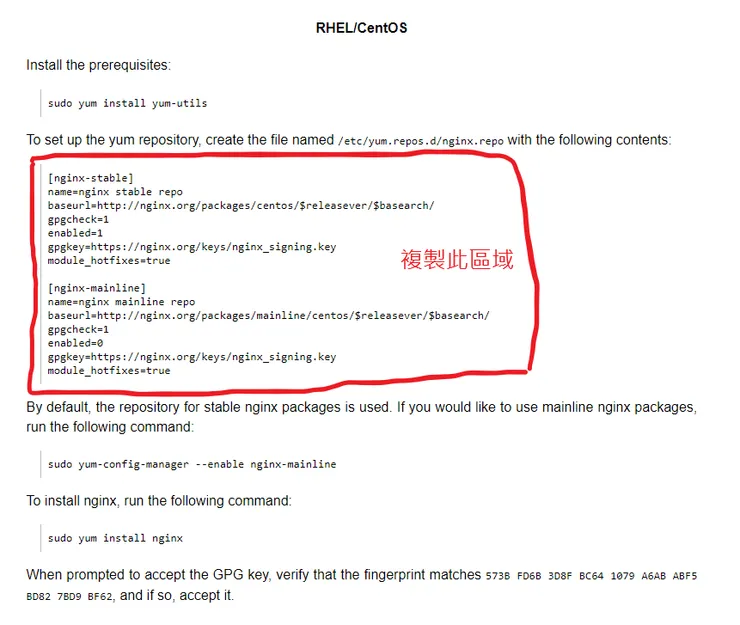
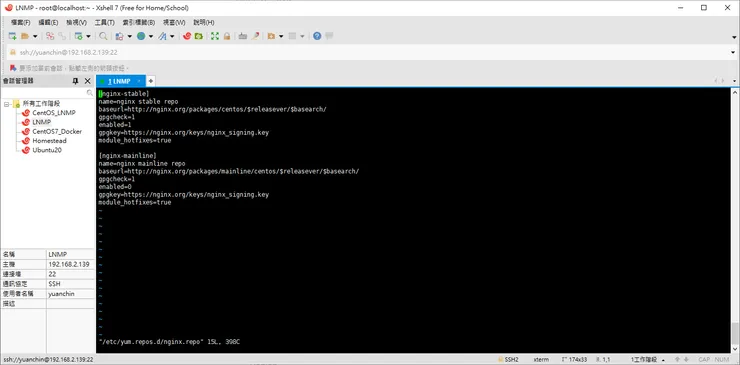
1.yum 源在 CentOS 已經默認存在,所以不需要再特別安裝,現在我們去到其目錄中新建且編輯 「nginx.repo」
vi /etc/yum.repos.d/nginx.repo2.將上圖紅色區塊複製,貼至 「nginx.repo」 中,完畢後保存
3.選擇主線 nginx 包
yum-config-manager --enable nginx-mainline4.安裝 nginx
yum -y install nginx5.測試 nignx 是否安裝成功
nginx -v測試瀏覽器是否能訪問 VirtualBox 的 IP 地址
1.關閉防火牆(每次系統重啟防火牆都要重新關閉)
systemctl stop firewalld又或者永久關閉
systemctl disable firewalld測試環境可以這樣做,但是在生產環境下不要關閉
2.關閉 SELINUX
編輯 SELINUX 的 config文件
vi /etc/selinux/config將其配置如下
# This file controls the state of SELinux on the system.
# SELINUX= can take one of these three values:
#     enforcing - SELinux security policy is enforced.
#     permissive - SELinux prints warnings instead of enforcing.
#     disabled - No SELinux policy is loaded.
# SELINUX=enforcing
SELINUX=disabled
# SELINUXTYPE= can take one of three values:
#     targeted - Targeted processes are protected,
#     minimum - Modification of targeted policy. Only selected processes are protected.
#     mls - Multi Level Security protection.
SELINUXTYPE=targeted
重啟 ECS 實例
shutdown -r row3.在外部的瀏覽器(指的是你現在使用的電腦瀏覽器)訪問 VirtualBox IP
啟動 nginx
systemctl start nginx查看 nginx 行程狀態
ps -aux | grep nginx
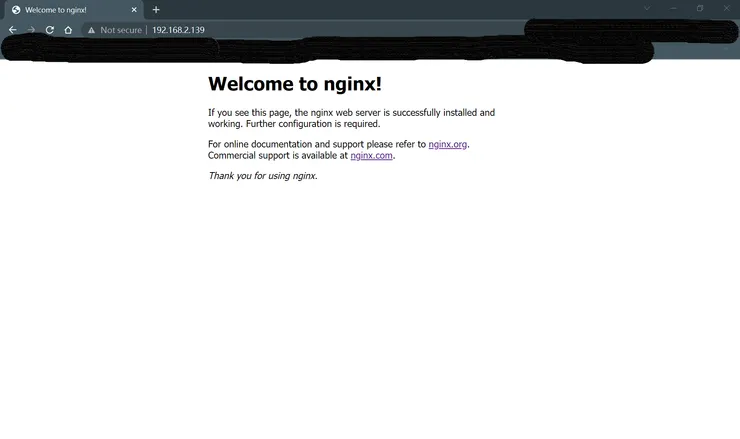
訪問 VirtualBox IP,看是否會有以下畫面
安裝 PHP
使用 remi repository 安裝 PHP
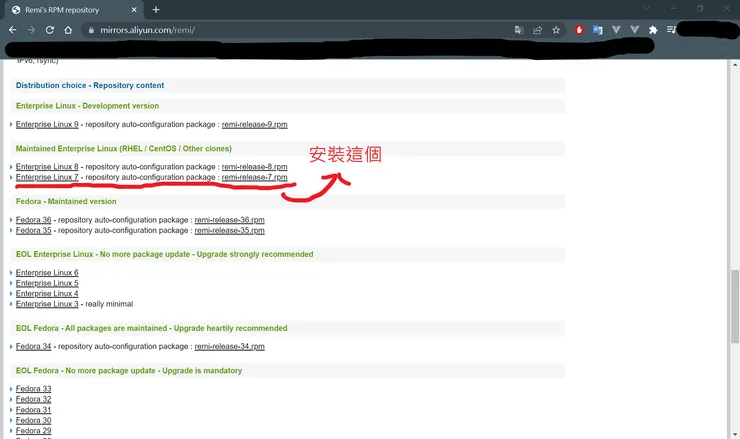
1.安裝阿里雲 remi-release-7.rpm,因為我們是使用 CentOS 7
yum -y install https://mirrors.aliyun.com/remi/enterprise/remi-release-7.rpm2.可以查看目前倉庫中的 PHP 版本
yum repolist all | grep php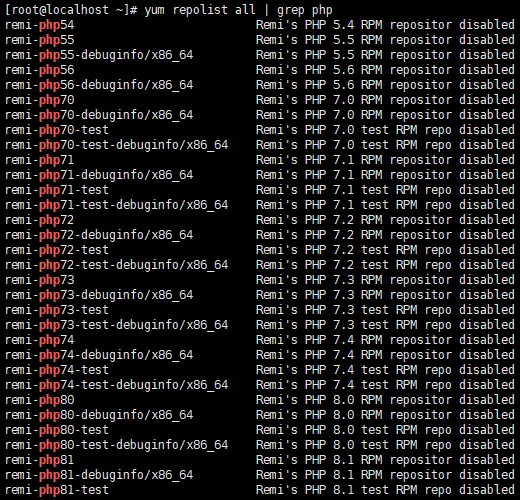
開始安裝 PHP 8 及 PHP 8 擴展
1.切換 PHP remi repository
yum-config-manager --enable remi-php812.開始安裝
yum -y install php php-cli php-fpm php-mysqlnd php-gd php-curl php-xml php-json php-zip php-devel php-mbstring php-pear php-bcmath php-redis3.執行 PHP 查看是否安裝成功
php -v
配置 PHP-FPM
1.用 vi 打開配置文件 www.conf,以下配置步驟都在此配置文件中完成
vi /etc/php-fpm.d/www.conf2. 將使用者及群組保持與 nginx 的一致

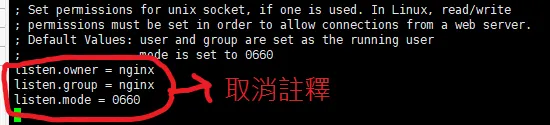
3.使用 Unix socket 通訊(僅能用於 Nginx 與 PHP_FPM 在同一伺服器上)
4.將 listen.owner, listen.group 使用者更改為 nginx
5.設置環境變數
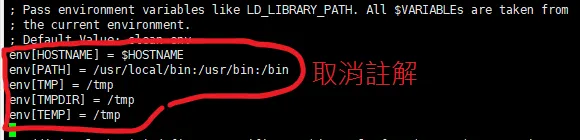
設置完後保存
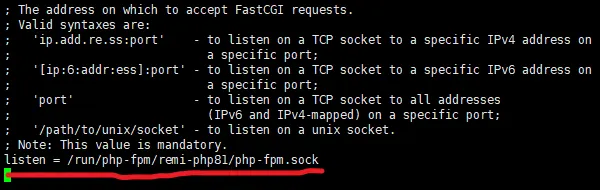
6.創建 /run/php-fpm/remi-php81 目錄,以供存放 sock 檔
mkdir -p /run/php-fpm/remi-php817.啟動 php-fpm
systemctl start php-fpm
systemctl enable php-fpm
8.查看 php-fpm 是否有運行
netstat -pl | grep php-fpm.sock安裝 MySQL
使用 MySQL 官方 yum 源
1.安裝 yum 源
rpm --import https://repo.mysql.com/RPM-GPG-KEY-mysql-2022可以查看一下 Mysql yum 源
yum list | grep mysql-community2.切換 mysql repository
yum-config-manager --disable mysql80-community
yum-config-manager --enable mysql57-community
再查看一次,看是否切換了
yum list | grep mysql-community3.開始安裝 MySQL
yum -y install mysql-community-server mysql-community-client4.啟動 MySQL
systemctl start mysqld
systemctl enable mysqld

配置 MySQL
1.初始化密碼
grep 'temporary password' /var/log/mysqld.log
2.登入 MySQL
mysql -u root -p #輸入暫存密碼3.重設 root 密碼
ALTER USER 'root'@'localhost' IDENTIFIED BY 'Pa$$w@rd0104';4.創建一個測試資料庫
CREATE DATABASE laravel;MySQL 配置完成,按 \q + Enter 離開
安裝其他程式
開始安裝 Composer
php -r "copy('https://getcomposer.org/installer', 'composer-setup.php');"

php composer-setup.php

php -r "unlink('composer-setup.php');"

mv composer.phar /usr/local/bin/composer

#運行 composer 命令
composer
安裝 Node.js + NPM + Yarn
#安裝 node.js npm
yum -y install nodejs npm

#安裝 yarn
npm install --global yarn

#查看 yarn 版本
yarn --version
為 Laravel 配置 Nginx
安裝 Laravel
1.創建 laravel 根目錄
mkdir -p /var/www/laravel

#切換至 /var/www/laravel
cd /var/www/laravel
2.使用 composer 安裝 laravel
composer create-project laravel/laravel .3.更改根目錄的所有者及儲存庫的權限
chown -R nginx:root /var/www/laravel
chmod 755 -R /var/www/laravel/storage
配置 Nginx
1.在 conf.d 下創建一虛擬主機配置文件 laravel.conf
vi /etc/nginx/conf.d/laravel.conf2.將以下代碼貼入 laravel.conf
server {
  listen 8080;

  # Log files for Debugging
  access_log /var/log/nginx/laravel-access.log;
  error_log /var/log/nginx/laravel-error.log;

  # The directory of web root
  root /var/www/laravel/public;
  index index.php index.html index.htm;

  # Your Domain Name
  server_name laravel.domain.test;

  location / {
    try_files $uri $uri/ /index.php?$query_string;
  }

  # PHP-FPM Configuration Nginx
  location ~ \.php$ {
    try_files $uri =404;
    fastcgi_split_path_info ^(.+\.php)(/.+)$;
    fastcgi_pass unix:/run/php-fpm/remi-php81/php-fpm.sock; # remi
    fastcgi_index index.php;
    fastcgi_param SCRIPT_FILENAME $document_root$fastcgi_script_name;
    include fastcgi_params;
  }

    location ~ /\.ht {
        deny all;
  }
}
3.重啟 nginx
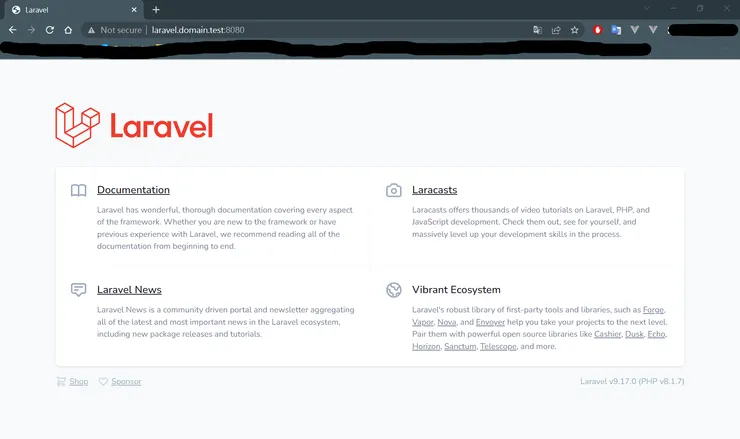
systemctl restart nginx完成後開啟就可以看到 laravel 畫面了