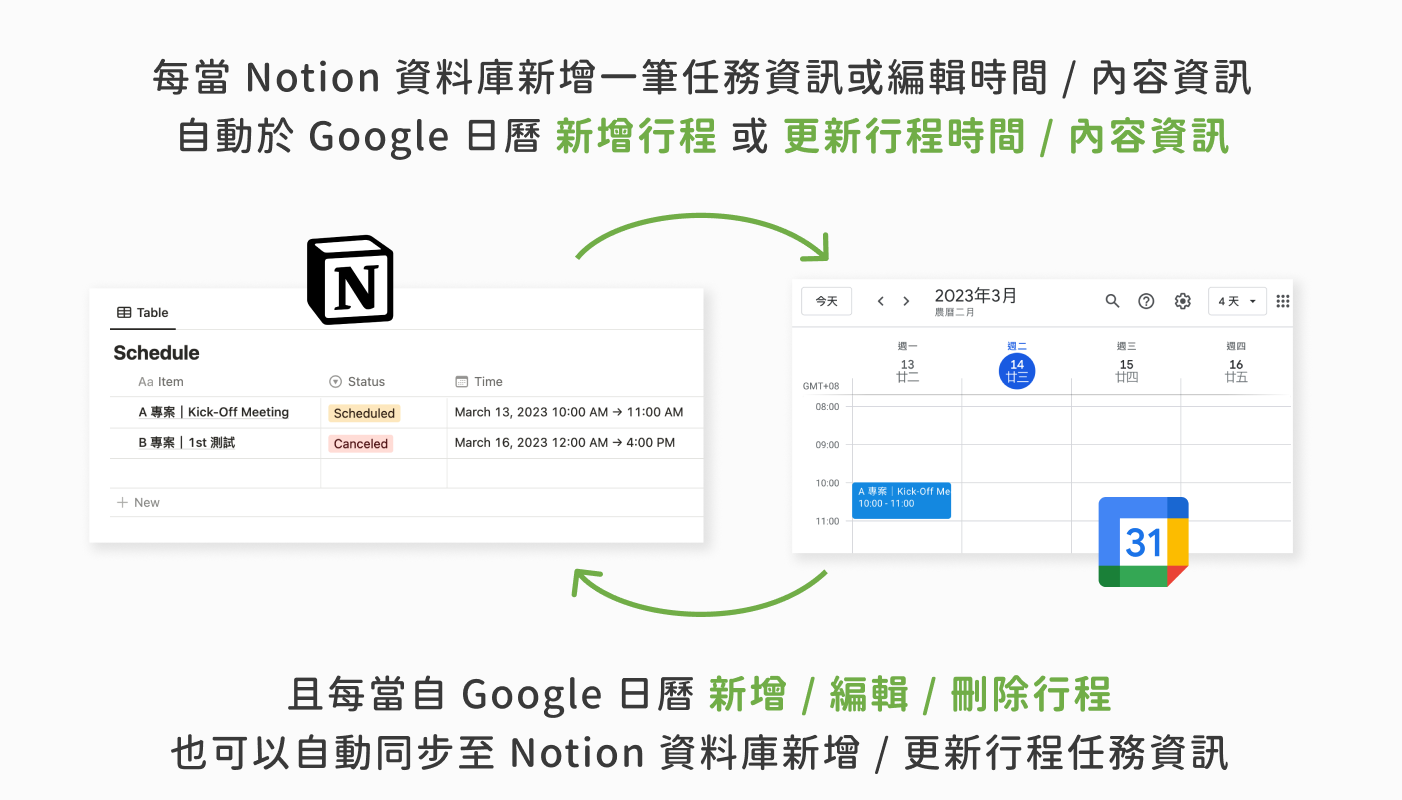
無法解決「雙向」同步 Notion 與 Google Calendar 日曆的問題嗎?透過 NoCode 自動化工具來解決吧!
本篇為 NoTime NoCode IG (@notime_nocode) - NoCode 工作術 #002《自動化雙向同步 Notion 與 Google Calendar 日曆》篇的詳細介紹文,如果還沒看過那篇貼文的讀者,歡迎前往我們 IG 查看、了解雙向同步 Notion 與 Google Calendar 日曆的流程與情境唷~
我們在 IG (@notime_nocode) 每週更新 NoCode 工作術 ✨ 持續和大家分享 NoCode 自動化工具,以及如何善用它來解決繁瑣任務、成為省時達人!把時間和專注力還給自己

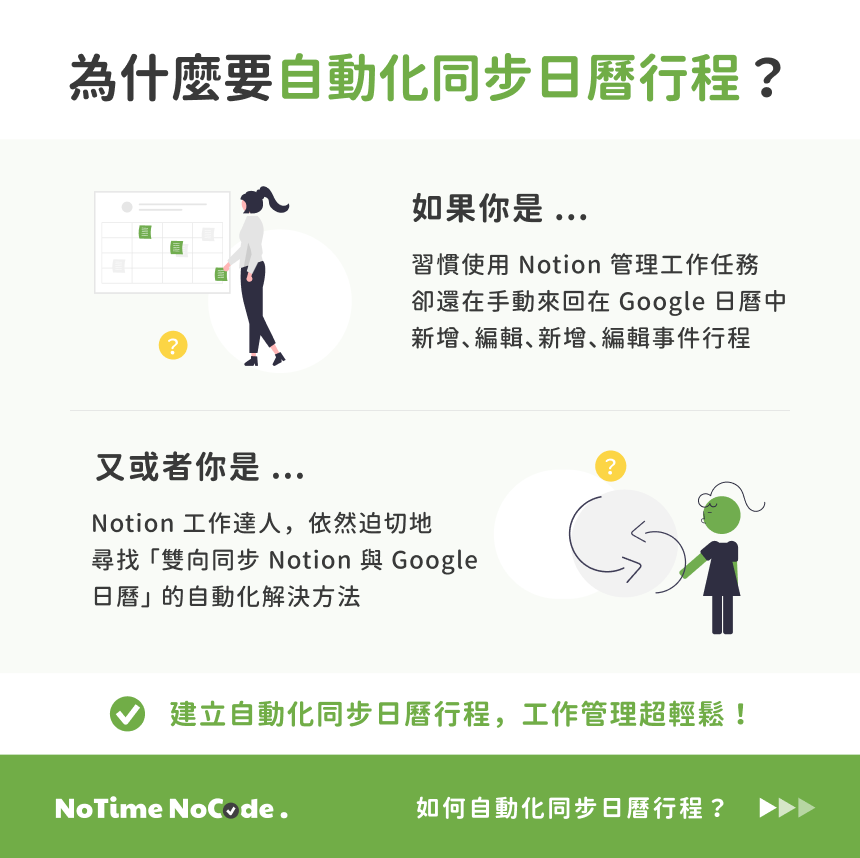
如何雙向同步 Notion 與 Google Calendar 日曆呢?
在 NoTime NoCode Instagram 的 NoCode 工作術 #002《同步 Notion 與 Google Calendar 日曆》篇中提到,我們主要使用到幾個工具來完成同步
- Notion
- Google Calendar 日曆
- Make (自動化串接工具) :
什麼是 Make 自動化串接工具?
你可以把 Make 想像成數位工具界的「強力膠水」!
它整合了 1,000+ 常見的雲端軟體應用程式 (e.g. Google Sheet, Slack, LINE, Gmail, Mailchimp, Hubspot ... 等),透過直覺且視覺化的拖拉模組,幫助你無需寫程式就能實現複雜且多元的自動化串接與資料流程處理功能~
不論你是業務、行銷、人資、行政 ... 等專業工作者,即使不懂程式也可以輕鬆串接整合數位工具唷!
🎉 如果你是還沒使用過 Make 的新朋友,現在可以透過我們此 專屬連結 註冊體驗,將可以在註冊後免費獲得專業版 1 個月的方案升級 (免綁卡,價值超過 NT$500+),讓你更好地嘗試與體驗 NoCode 的方便~ 🥳
ps: 從免費版事前升級的好處是,在還不熟悉 Make 操作時,避免使用免費版試錯到設計好流程後,根本沒剩多少自動化流程的作業餘量 “Ops” 可以使用 (以上圖流程示意,每一個數位工具節點在 Make 內執行一次則消耗 1 個單位的作業用量,稱為 1 個 “Ops”。詳細說明與比較可以參考 Make 官方比較表)~

- Step 1. 在 Notion 中建立 Database 資料庫並設定同步日曆時所需要的欄位
- Step 2. 建立 or 沿用需要跟 Notion 同步的 Google Calendar 日曆
- Step 3. 建立雙向同步 Notion 與 Google Calendar 日曆流程的整合串接
就讓我們開始吧!
🎉 如果你希望可以更快地實作此篇雙向同步 Notion 與 Google Calendar 日曆流程,我們也有提供此自動化流程的進階範本 ,方便你直接匯入 Make 自動化工具使用,就不用再一步步建立串接流程了!同時還額外加碼提供「Notion 資料庫範本」唷!有興趣的讀者可以前往我們 🔗此範本市集連結 選購套用!🎉
也歡迎訂閱《NoCode 工作術,工作更專注》電子報,我們將在每週 IG 發布新貼文後,在電子報中分享貼文情境延伸的細節操作教學唷!
Step 1. 在 Notion 中建立 Database 資料庫並設定同步日曆時所需要的欄位
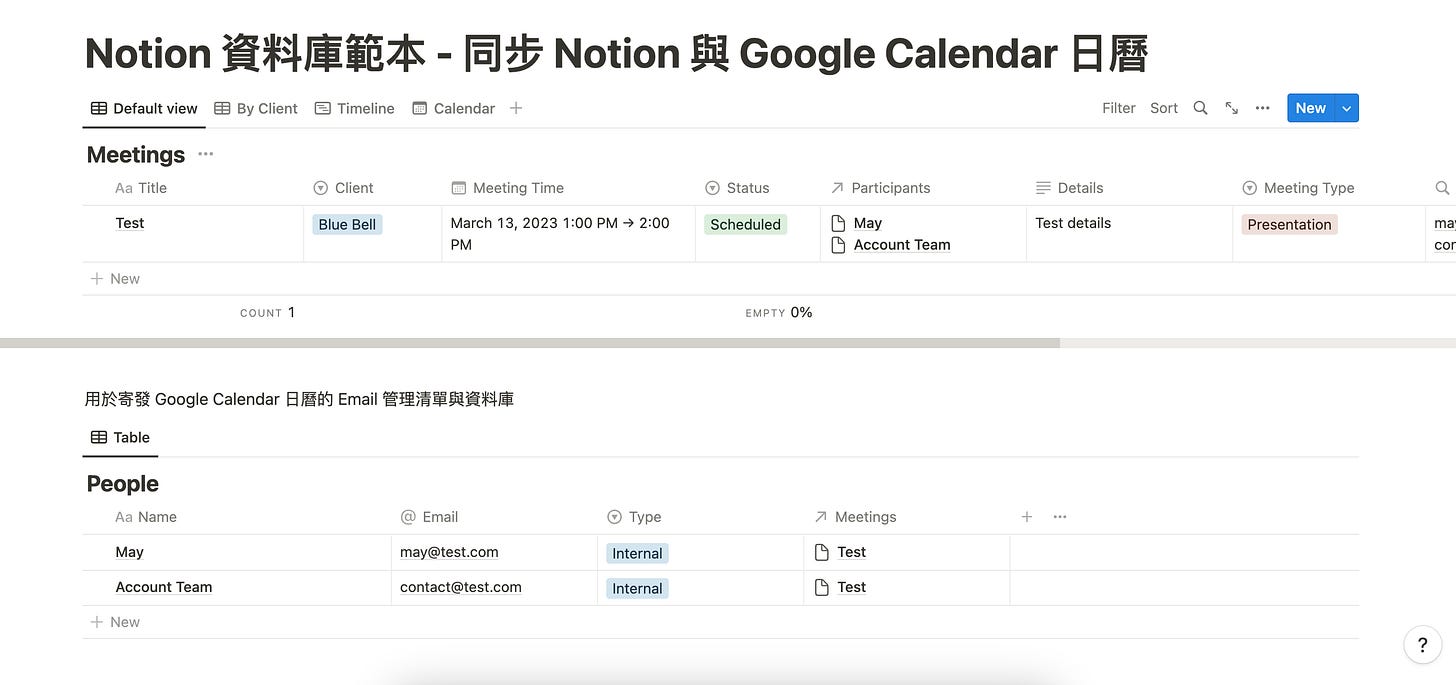
以上面這張 Notion 資料庫截圖為例,我們可以在 Notion 中建立兩個相關聯的 Database 資料庫及其欄位,例如:主題 Title、時間 Meeting Time、狀態 Status(是否同步至 Google)、與會者名單 Participants (欄位關聯至另外一個 People 資料庫)、行程描述 Details 、Event ID (用於判斷行程是否已建立) 等欄位,方便未來建立不同專案 / 行程項目及邀請參與者時,將資訊同步到 Google Calendar 日曆使用!
ps: 上述會使用到的 Notion 資料庫欄位也都會在下面步驟教學中提到,但在此特別提醒讀者,請確保在自己的 Notion 資料庫中有新增以下幾個關鍵欄位唷:
- 請新增 Event ID 這個 Text 屬性的欄位
- 此 Event ID 會於系統建立 Google 日曆行程時,自動寫回 Notion 資料庫欄位

- 請新增 Status 這個 Select 屬性的欄位,並在其中新增 Scheduled、Cancelled 選項
- 請新增 Meeting Time 這個 Date 屬性的欄位
- 資料庫內的 Item 項目也都請確保有包含 Start & End Date 起訖的日期時間哦,這樣 Google Calendar 日曆才可以成功建立行程
Step 2. 建立 or 沿用需要跟 Notion 同步的 Google Calendar 日曆
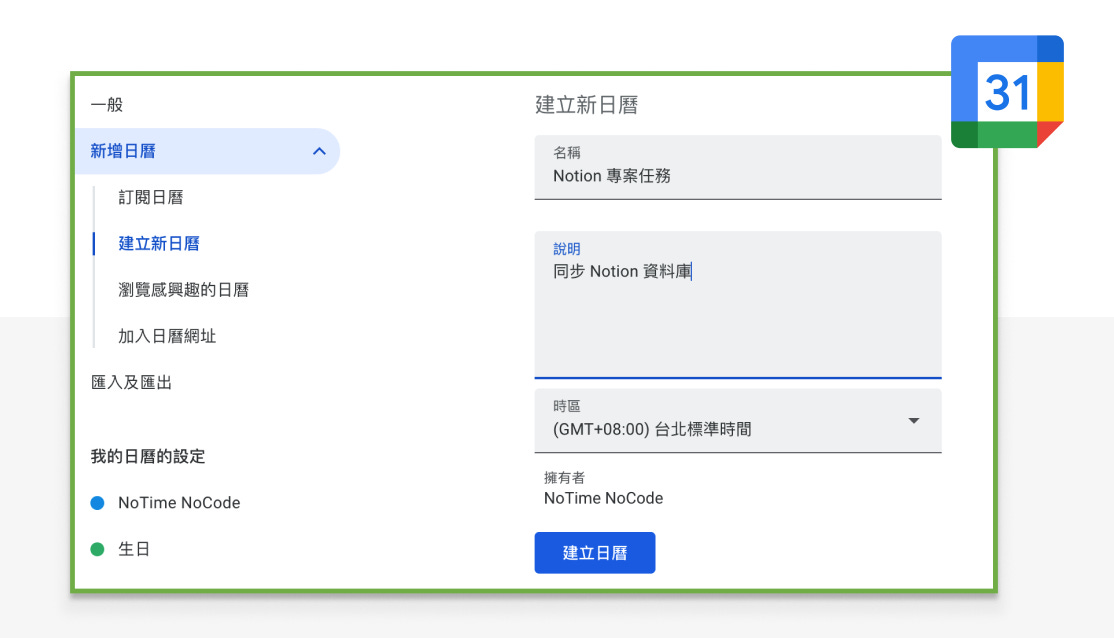
可以沿用 Google 帳戶既有的主日曆或是建立新日曆,若要沿用既有日曆,則可以略過此步驟。
Step 3. 建立雙向同步 Notion 與 Google Calendar 日曆流程的整合串接
最關鍵的一步,我們會需要把兩個數位工具整合在一起!這時候我們就用到本文一開始提到的 Make 自動化工具~
而要實現雙向同步 Notion 與 Google Calendar 日曆,會需要在 Make 內建立兩個情境流程 (也就是在 Make 內建立 2 個 Scenario),分別是以下
- Notion 資料庫同步至 Google 日曆
- Google 日曆同步至 Notion 資料庫
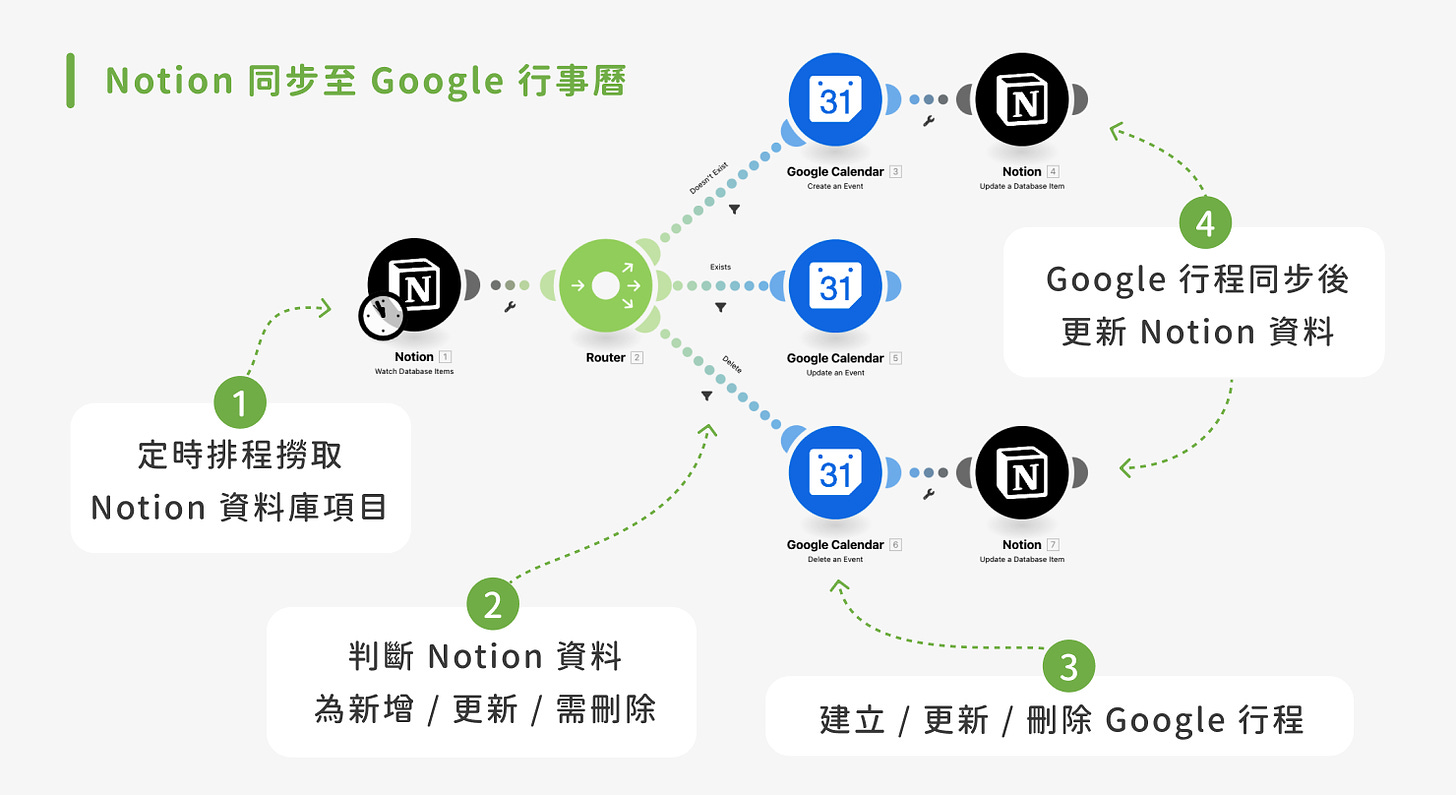
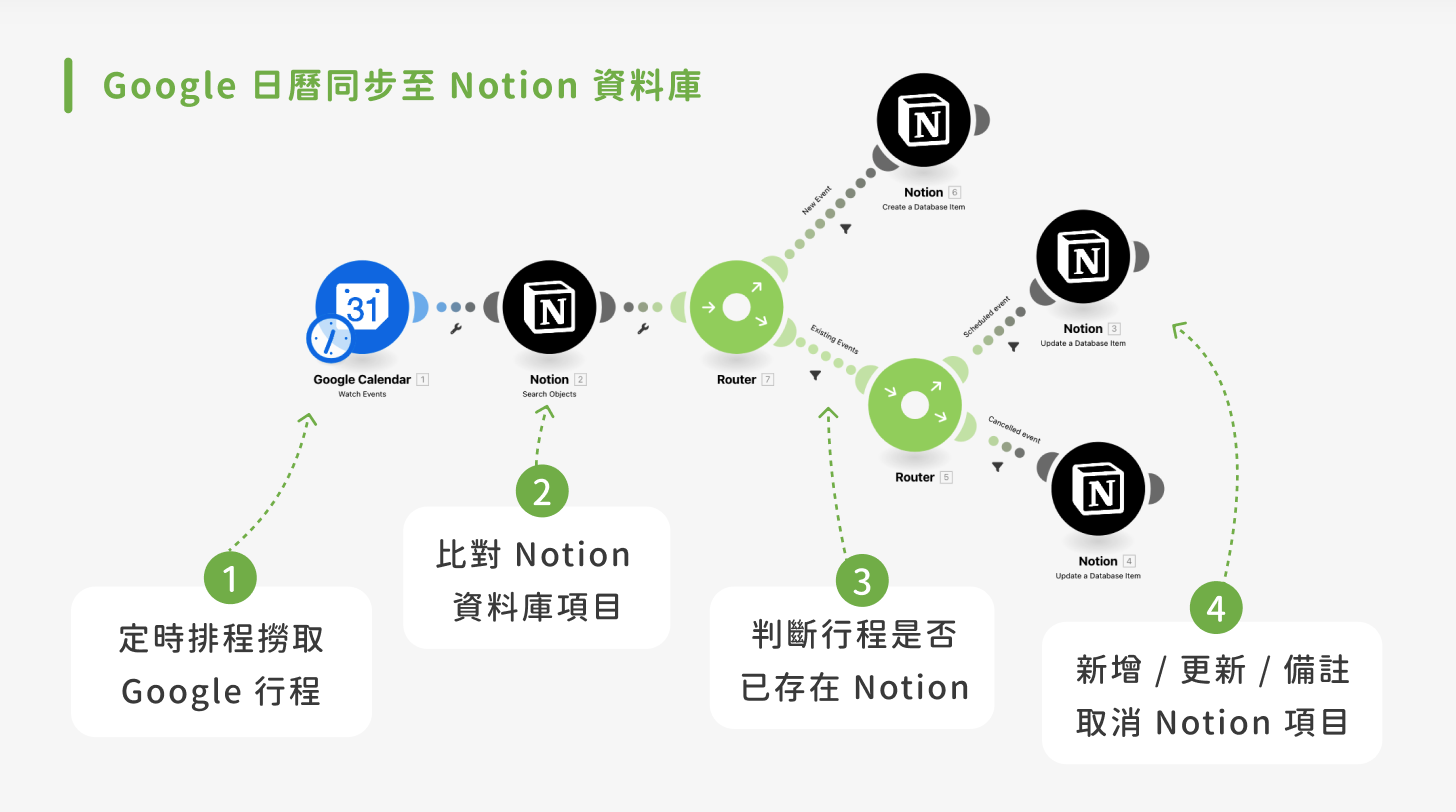
而上方截圖為串接整合後的結果示意,我們一共會使用到 Notion 與 Google Calendar 的多個模組節點
- Google Calendar:
- Watch Events 模組節點:
- 用於定時排程撈取 Google 行程
- Create、Update、Delete Events 模組節點:
- 用於建立 / 更新 / 刪除 Google 行程 - Notion:
- Watch Database Items 模組節點 (雙向同步最關鍵的節點)
- 用於定時排程撈取 Notion 資料庫項目
- Update a Database Item 模組節點
- 用於 Google 行程同步後更新 Notion 資料
- 用於新增 / 更新 / 備註 取消 Notion 資料庫項目
- Search Objects 模組節點
用於比對 Notion 資料庫項目
🎉 如果你希望可以更快地實作此篇雙向同步 Notion 與 Google Calendar 日曆流程,我們也有提供此自動化流程的進階範本 ,方便你直接匯入 Make 自動化工具使用,就不用再一步步建立串接流程了!同時還額外加碼提供「Notion 資料庫範本」唷!有興趣的讀者可以前往我們 🔗此範本市集連結 選購套用!🎉
讓我們接續吧 …
—
Step 3-1-1. 建立 Notion - Watch Database Items 模組節點
如果是第一次操作 Make 的朋友,可以透過這篇 Make 官方教學了解如何建立第一個模組節點。基本上登入 Make 後台後
- 從左側欄點擊前往 Scenarios
- 進入下一頁的右上角會有按鈕「+ Create a new scenario」可以建立新的流程
- 進入新流程以後,可以參考下方 gif 動圖,點擊「+」並搜尋 Notion 模組內的「Watch Database Items」這個選項就完成第一步的新增囉

新增完節點後,會需要做基本的 Notion 帳號授權與綁定,這邊也有一篇官方的帳號授權與綁定教學可以參考
*除了參照 官方的 Notion 帳號授權 內所提到的必要設定步驟外,請讀者特別留意,務必要在兩個 Notion 資料庫都建立與 Make 的 connections 授權哦 (很多讀者可能會漏了這個步驟。這樣才可以讓 Make 正常取得所有 Notion 關聯資料庫的欄位資料)

在授權完成後,請在 Notion 節點中搜尋你在 Step 1. 所設定好 Notion Database 資料庫名稱 (正常來說可以直接透過 Search 搜尋名稱就找到所建立的資料庫)
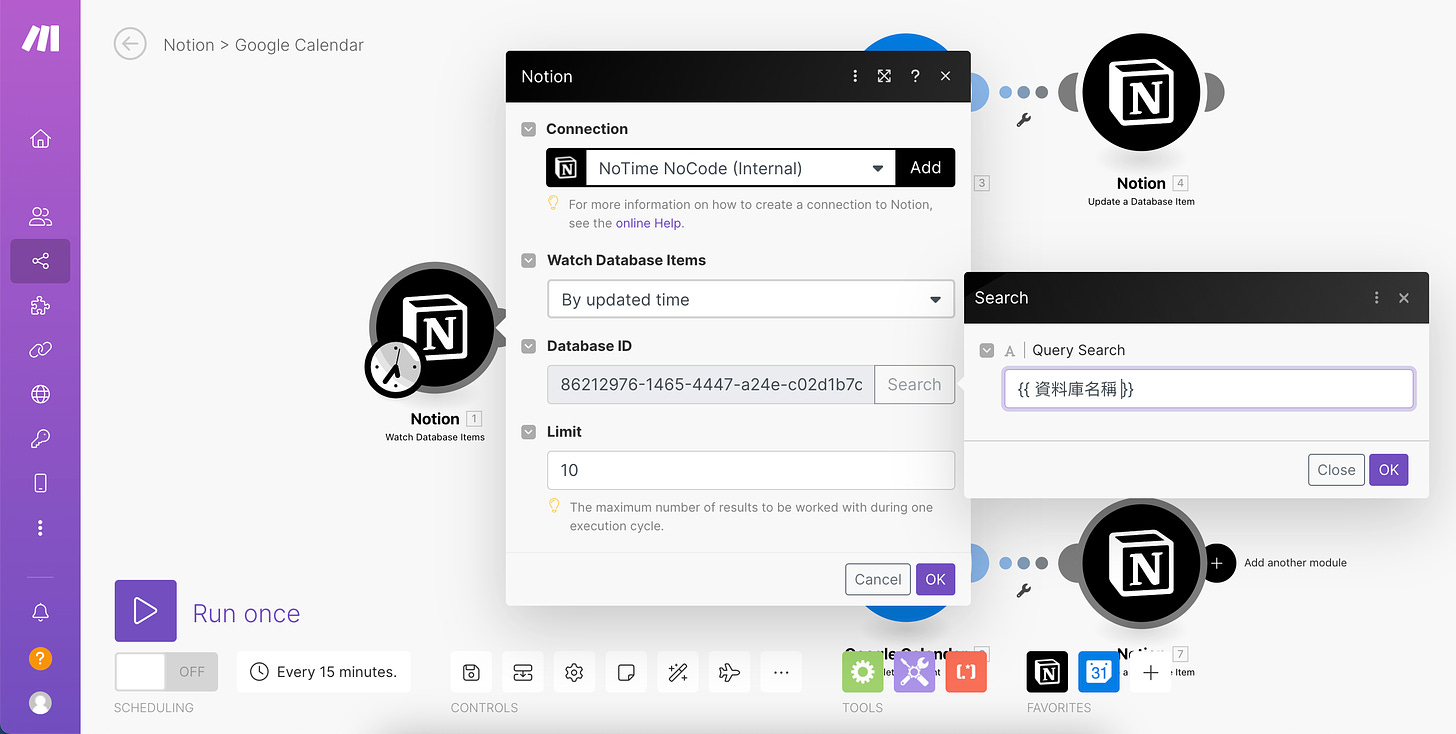
如果因為遇到一些狀況無法搜尋到 Notion 資料庫,也可以於 Database ID 的欄位中,直接貼上 Notion 資料庫網址後面的 ID 唷 (下圖紅色框起處)
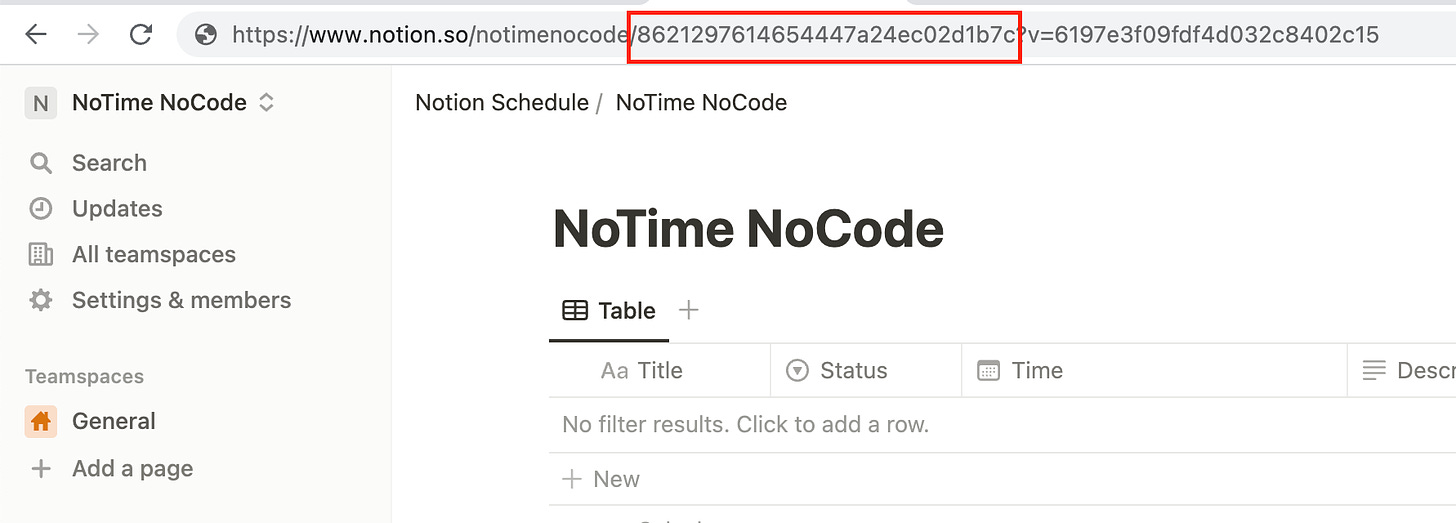
*注意: 在此模組節點中,有兩個欄位要特別留意
- Watch Database Items: 請設定 “By updated time”,這樣自動化流程才會在排程時間點觸發時,檢查你有新增、更新的 Notion 資料庫項目
- Limit: 可以彈性設定一個排程時間點觸發時,要處理的 Notion 資料庫項目數 (以上圖預設為 10)
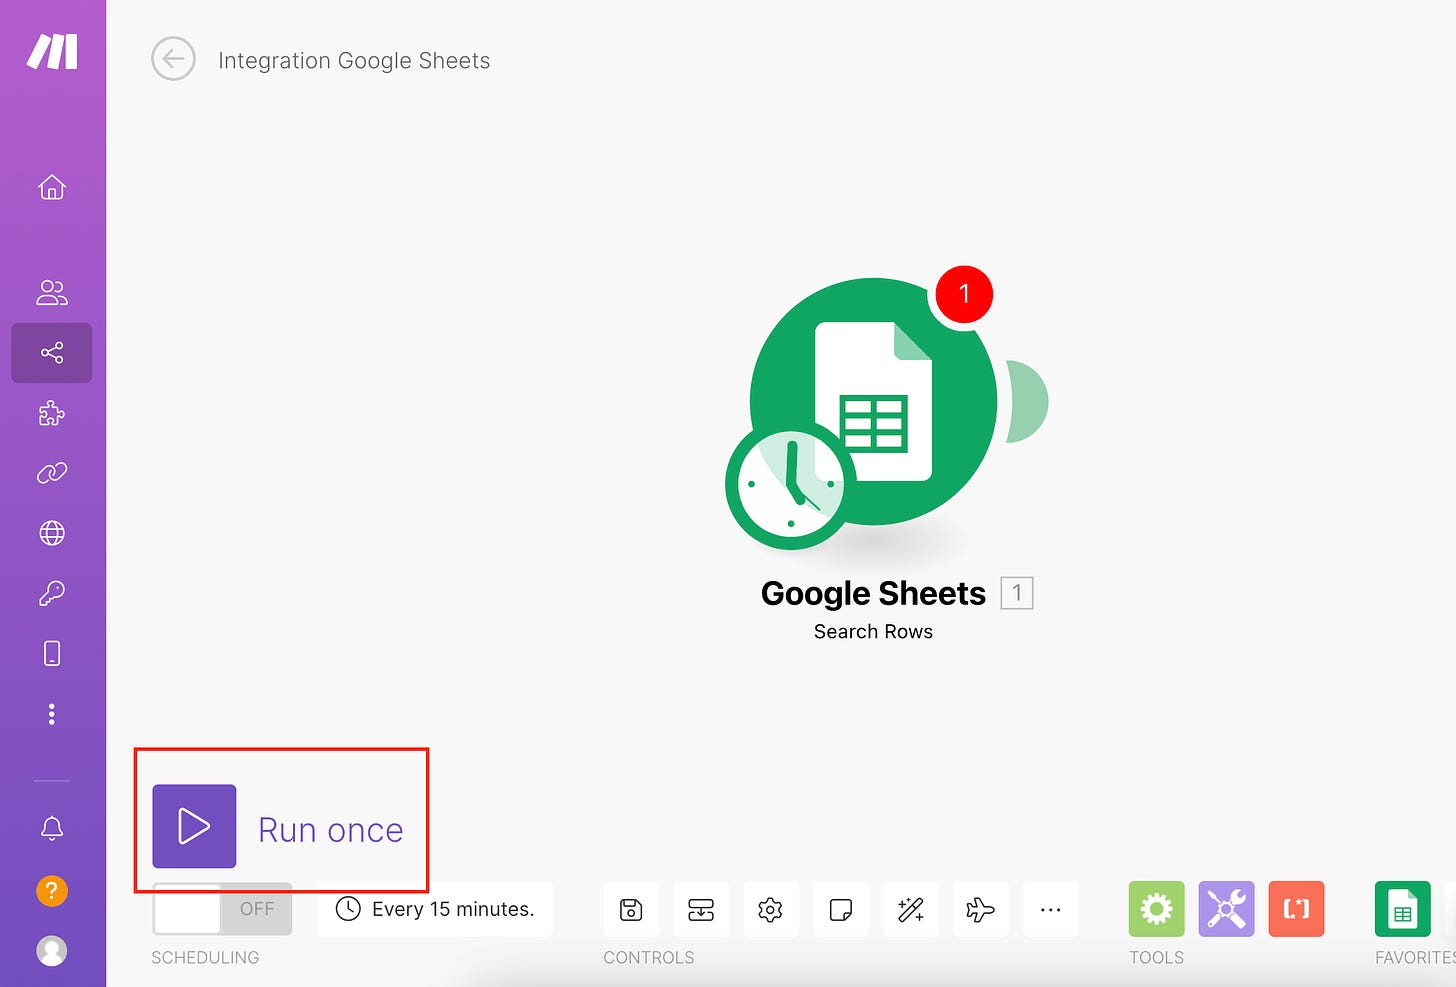
小提示: 通常在設定完第一個模組節點後,我會點擊整個畫面左下角的 Run Once 進行測試,看看資料是否有抓成功唷。若有成功,模組節點右上角會出現一個白色的數字泡泡,點擊後將可以看到你原本建立於 Notion 資料庫內的資料 (下圖是以 Google Sheet 模組節點作為示意,所以模組節點會跟 Notion 長得不太一樣唷)

—
Step 3-1-2. 建立 Google Calendar - Create、Update、Delete Events及 Router 模組節點
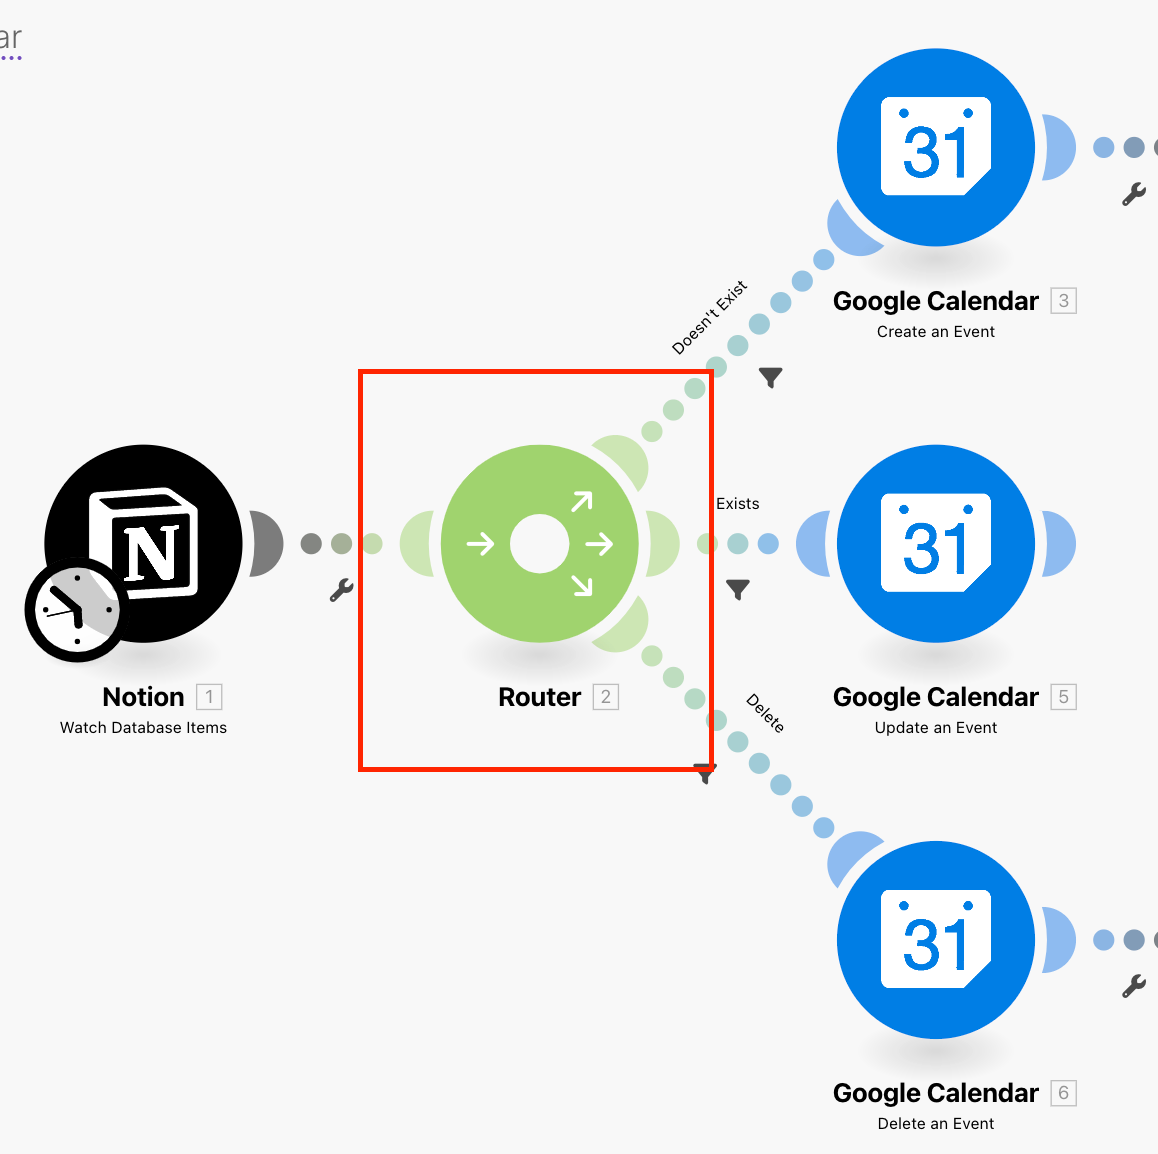
在設定好 3-1 的 Notion 模組節點後,我們可以設定篩選條件,將不同狀態的 Notion 資料庫項目進行判斷,以用來建立 / 更新 / 刪除 Google 行程
而在新增 Google Calendar 模組節點之前,我們要先新增一個 Router 節點,用於分流不同狀態的 Notion 資料庫項目 (此為官方 Router 介紹)
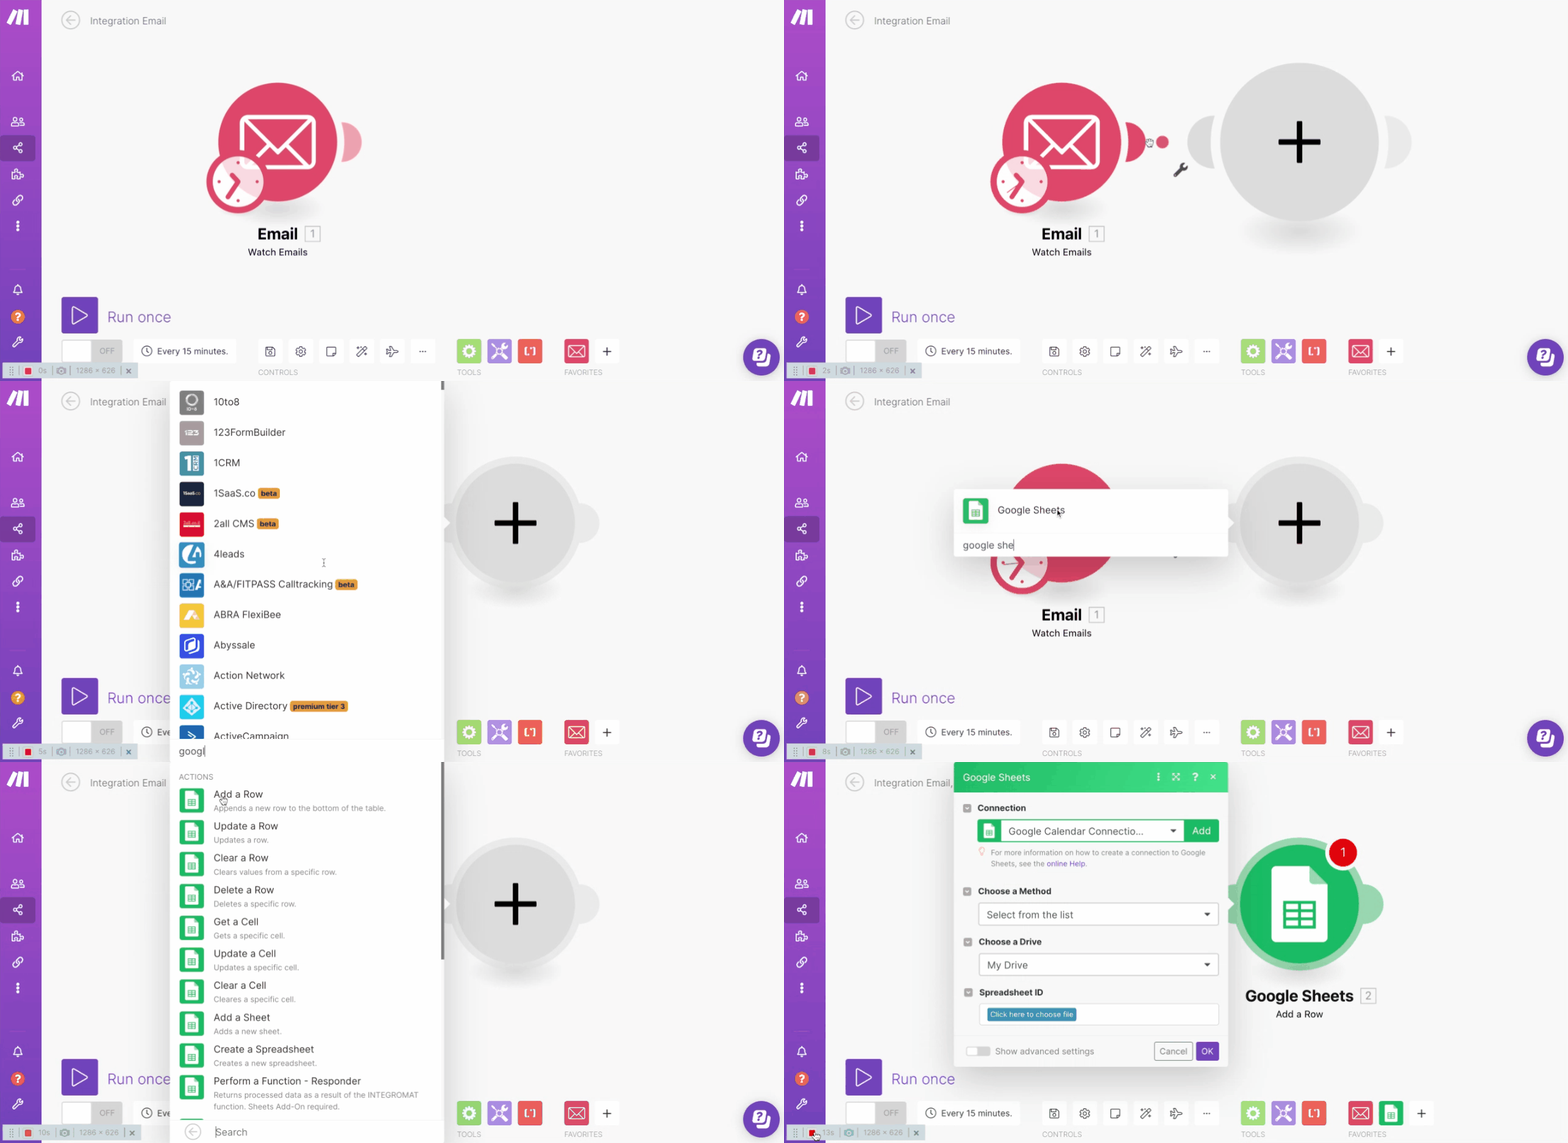
滑鼠移動到前一步驟所建立好的模組節點上,右邊會出先一個 + Add another module,點擊後就會出現另外一個空白的模組節點可以讓你新增 Google Docs - Create a Document from a Template 模組節點
(以下僅為操作示意,圖示並非 Router & Google Calendar 模組節點)
以同樣方式,在 Router 模組節點上,分別新增 Google Calendar 的 Create、Update、Delete Events 模組節點
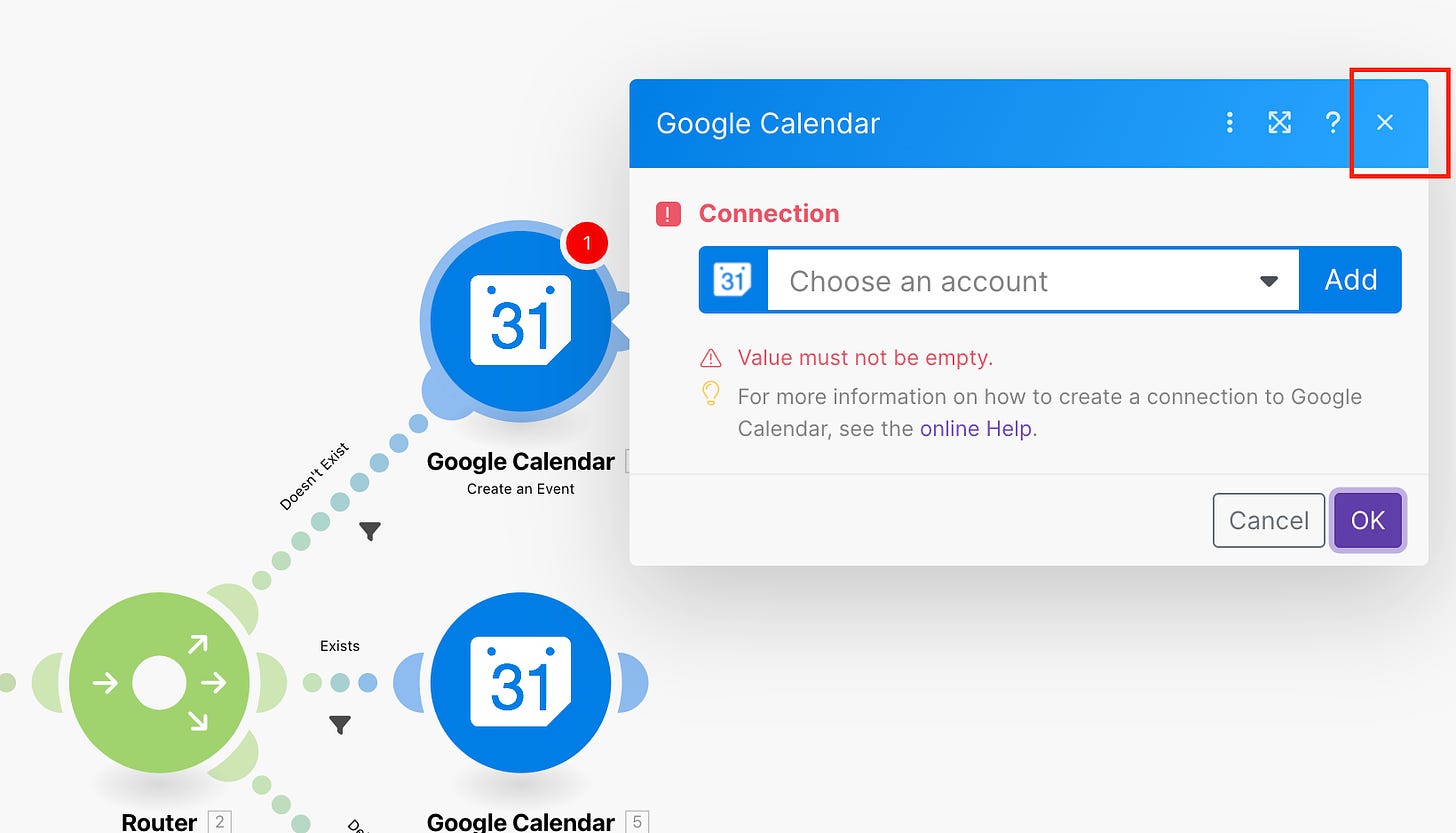
ps: 新增 Google Calendar 節點模組後,可以先點擊右上角的叉叉關閉視窗,不需要先設定唷,後面會再跟讀者分享對應的設定方式
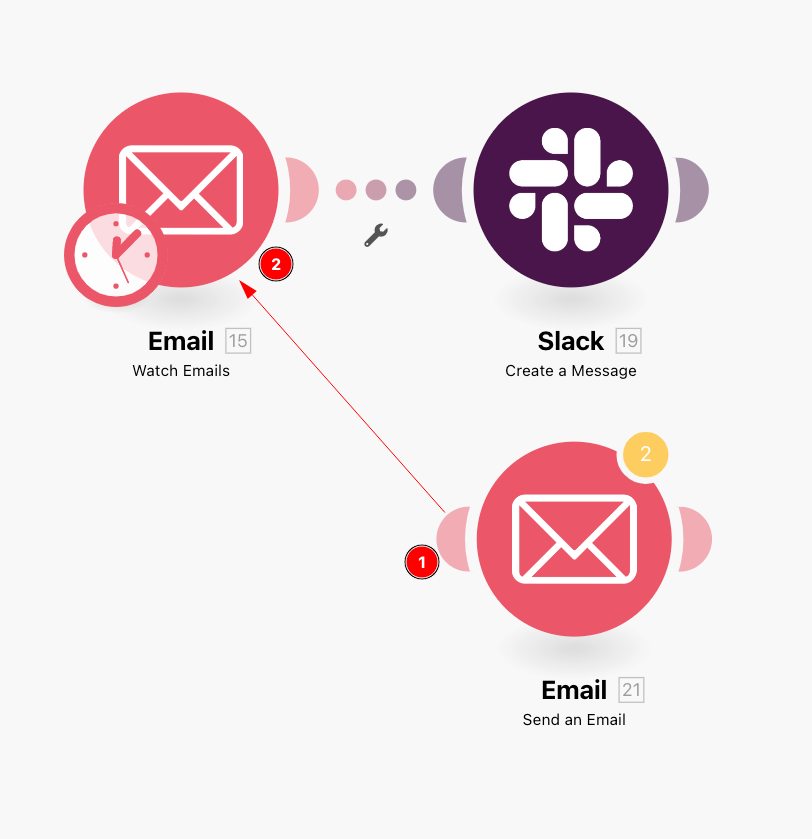
或你也可以先建立 Google Calendar 各自的模組節點後,再用拖曳的方式將節點之間相連在一起唷 (以下圖示意為例,按住紅色的數字 1 後,再拖曳到紅色的數字 2)
完成 Router 與 Google Calendar 各模組節點的連結後,可以先在節點之間的連結線上設定篩選條件 (下圖為篩選條件建立的範例示意)
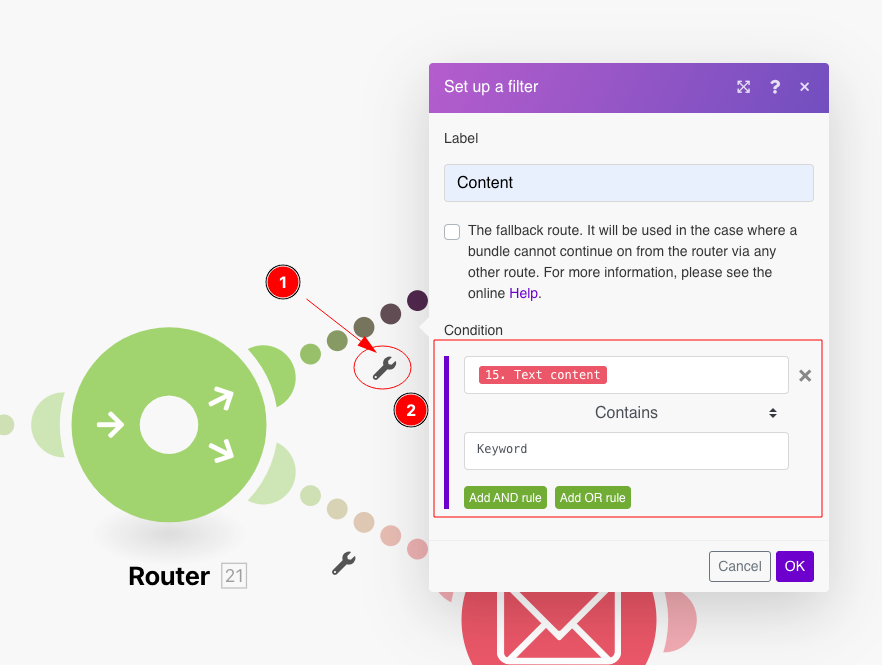
以我們有三種不同的 Google Calendar 模組節點 (Create、Update、Delete Events) 來說,都會需依據最前面 Notion 資料庫項目的欄位資料而進行篩選與分配如下
- Google Calendar - Create an Events 所需的篩選條件
- 當 Notion 項目的 Event ID 這個欄位為空值 (null)
- 要記得在 Notion 資料庫內建立 Event ID 這個欄位,此 Event ID 會於系統建立 Google 日曆行程時,自動寫回 Notion 資料庫欄位

- 當 Status 這個欄位為 Scheduled
- 要記得在 Notion 資料庫內建立 Status 這個欄位,並有 Scheduled 這個選項
ps: 若不知道如何帶入前面 Notion 資料,在建立好 Notion 模組節點試 Run once 成功後,點擊篩選器內的空白條件欄位後,就會出現可以選擇前面 Notion 模組節點資料內容 (Properties Values) 的畫面哦


2. Google Calendar - Update an Events 所需的篩選條件
- 當 Notion 項目的 Event ID 這個欄位 ”不為” 空值 (null)
- 當 Status 這個欄位為 Scheduled

3. Google Calendar - Delete an Events 所需的篩選條件
- 當 Notion 項目的 Event ID 這個欄位 ”不為” 空值 (null)
- 也可以設定成如下篩選條件: 當 Notion 項目的 Event ID 這個欄位 ”存在 Exists”
- 當 Status 這個欄位為 Cancelled

完成篩選條件的設定後,就可以先進行後面 Google Calendar 模組節點的授權囉!完成授權即可針對 Google Calendar 各別的 Create、Update、Delete 模組節點進行相對應的設定~
- Google Calendar - Create an Events 所需的對應設定
- Create an Event: In Detail
- Calendar ID: 選擇你要同步的 Google Calendar 日曆
- Event Name: 帶入 Notion 資料庫欄位項目的主題 Title (*Notion 欄位可能將依據讀者所建立資料庫不同而異)- Start / End Date: 帶入 Notion 資料庫欄位項目的起迄日期 Meeting Time
- Description: 帶入 Notion 資料庫欄位項目的詳細資訊 Details
- Attendees: 帶入 Notion 資料庫欄位項目的 Emails
- 需開啟設定視窗左下角的 Show advanced settings 才會看到唷Create an Events 所需的對應設定
- 並請選擇 Emails 的 array 類型參數 (可參考下方截圖示意)。主要是因為在 Notion 的資料庫欄位是用 Rollup 的類型


2. Google Calendar - Update an Events 所需的對應設定
- Event ID: 帶入 Notion 資料庫欄位項目的 Event ID
- 此 Event ID 為 Google Calendar - Create an Events 模組節點建立行程後所產生並寫入 Notion 資料庫欄位的資訊 (後面步驟會提到)
- 其他與 1. Create an Events 所需的欄位基本上一樣 (因為是更新既有欄位資料)
- 讀者也可以依據自己需求調整相關欄位Update an Events 所需的對應設定

3. Google Calendar - Delete an Events 所需的對應設定
Event ID: 帶入 Notion 資料庫欄位項目的 Event IDDelete an Events 所需的對應設定

完成 Google Calendar 日曆各模組節點的設定後,讀者可以在 Notion 資料庫中新增一個項目,再點擊 Make 的 Run once,應該就會有新的行程建立到 Google Calendar 日曆囉~
—
Step 3-1-3. Notion - Update a Database Item 模組節點
終於到了同步 Notion 至 Google Calendar 日歷的最後一步,我們要把從 Google Calendar - Create & Delete Events 模組節點所建立與刪除 Google Calendar 行程的資訊更新回 Notion 資料庫項目欄位內。
所以讓我們在 Google Calendar - Create & Delete Events 模組節點後方,各自新增一個 Notion - Update a Database Item 模組節點:
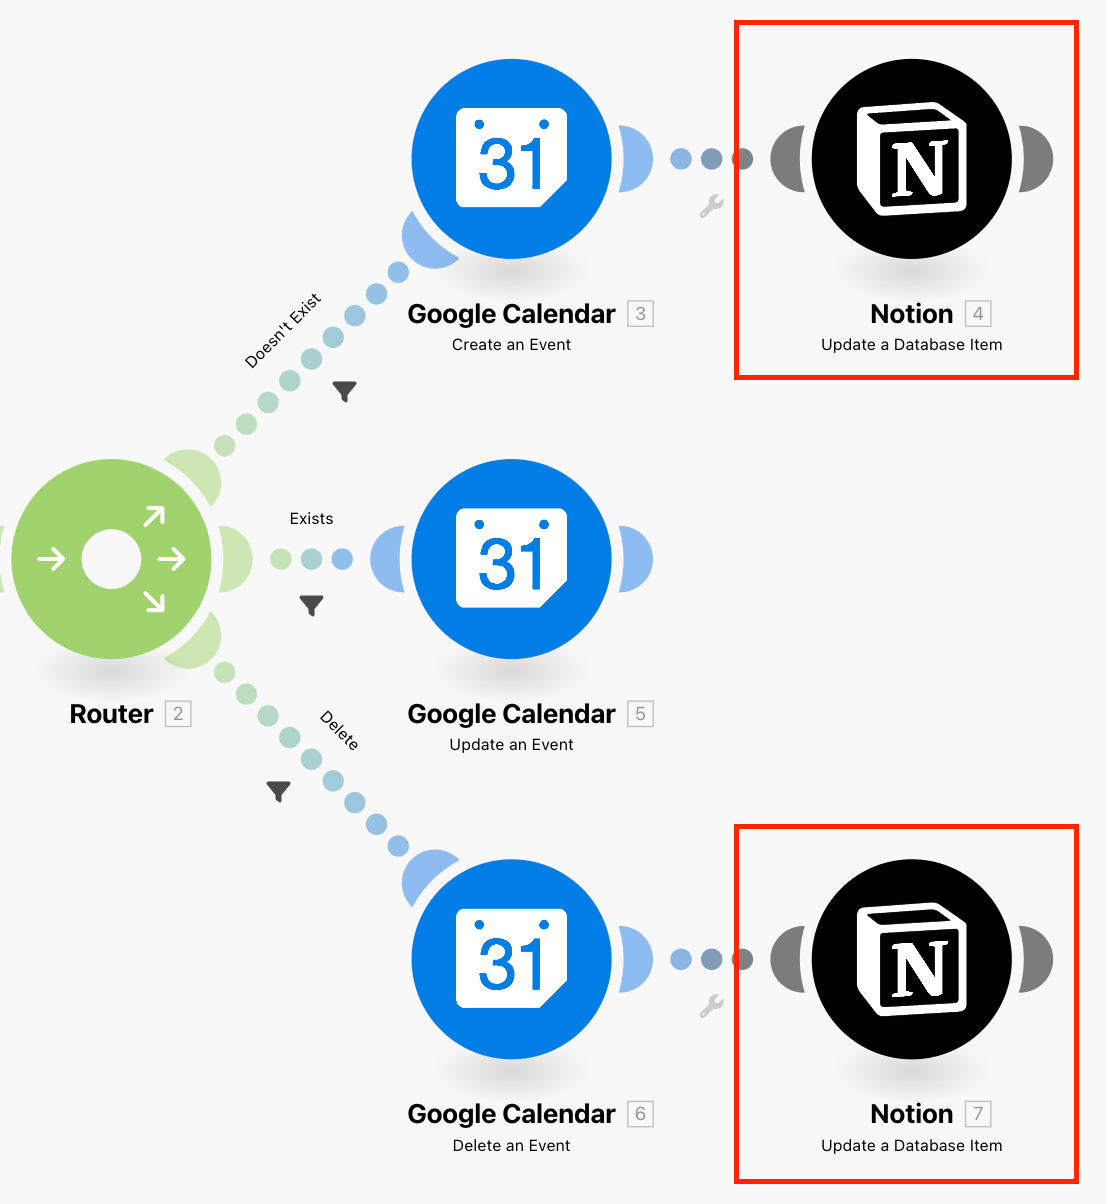
並在各自的模組節點中,對應設定需更新的欄位資料
- 當今天 Google Calendar 建立行程 (Create an Event) 後
- Database Item ID: 帶入最前面第一個 Notion 模組節點所取得的資料庫項目 ID
這樣才可以知道要更新哪一個 Notion 項目資料

- Event ID: 帶入前面 Google Calendar - Create an Event 模組節點所產生的 Event ID
*注意:
- Notion 資料庫欄位 Event ID 可能會依據讀者所建立的欄位名稱不同而異
- 通常在此 Notion 模組設定中,系統會自動讀取出資料庫所有的欄位名稱 (e.g. 主題 Title, 與會者 Attendees, Emails … 等)
- 而所帶入的 Google Calendar Event ID 則用於未來要刪除行程時使用

2. 當今天 Google Calendar 刪除行程 (Delete an Event) 後
- Database Item ID: 同上一步,需要此欄位
- Event ID: 因為是刪除資料,所以需要帶入一個空值 (null) 來移除原本 Google Calendar 的 Event ID
- 這個空值 (null) 可以在下方示意圖中所述的 General functions 功能清單中找到

恭喜!完成以上步驟後,可以測試看看!都沒問題的話,我們就完成其中一個 Notion 資料庫同步至 Google 日曆的自動化串接流程啦!
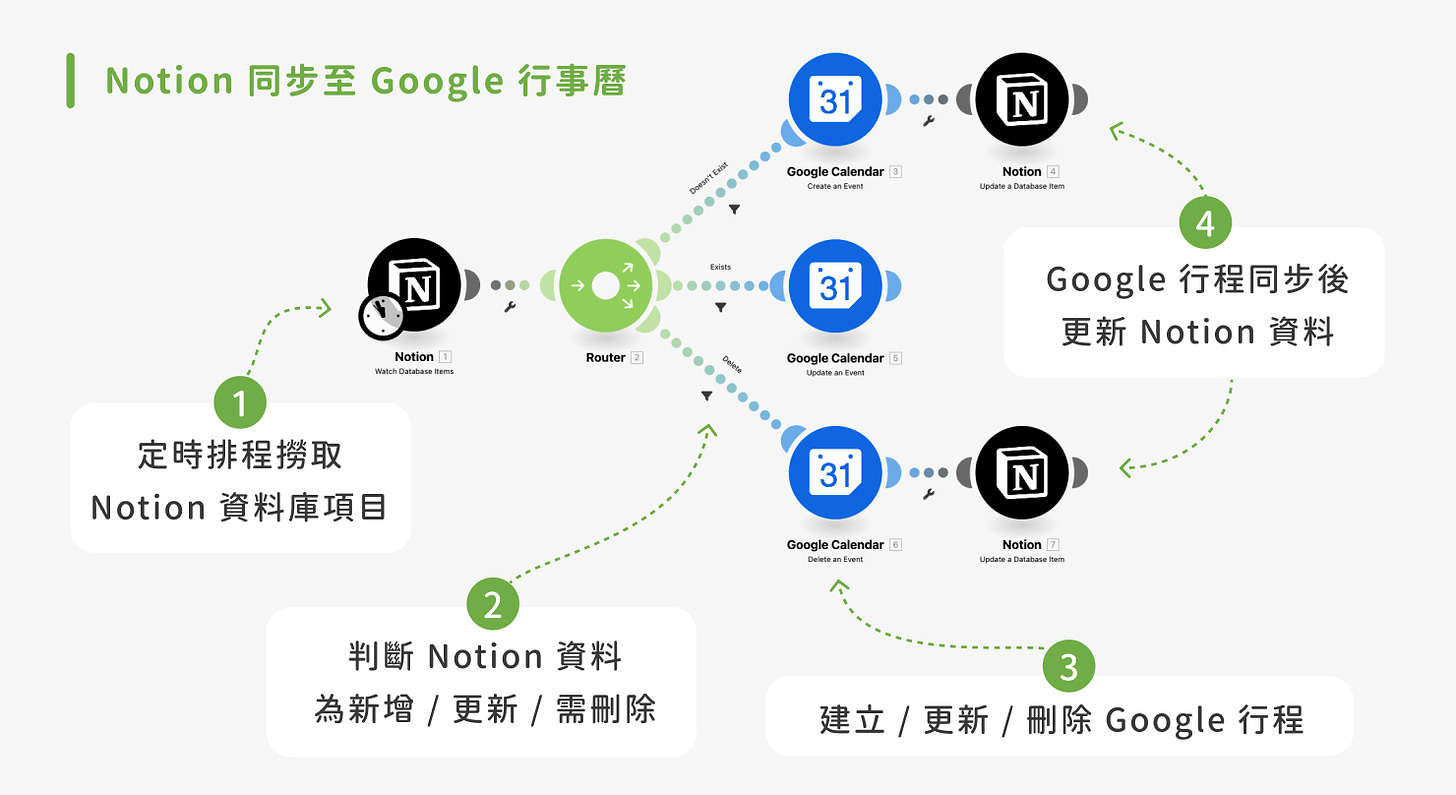
如果操作過程中有任何問題,也歡迎透過 NoTime NoCode IG (@notime_nocode) 私訊我們,或來信 contact@notimenocode.com 聯繫詢問唷~

接下來就剩下將 Google 日曆同步至 Notion 資料庫情境得自動化流程囉!
🎉 如果你希望可以更快地實作此篇雙向同步 Notion 與 Google Calendar 日曆流程,我們也有提供此自動化流程的進階範本 ,方便你直接匯入 Make 自動化工具使用,就不用再一步步建立串接流程了!同時還額外加碼提供「Notion 資料庫範本」唷!有興趣的讀者可以前往我們 🔗此範本市集連結 選購套用!🎉
讓我們繼續完成它吧!
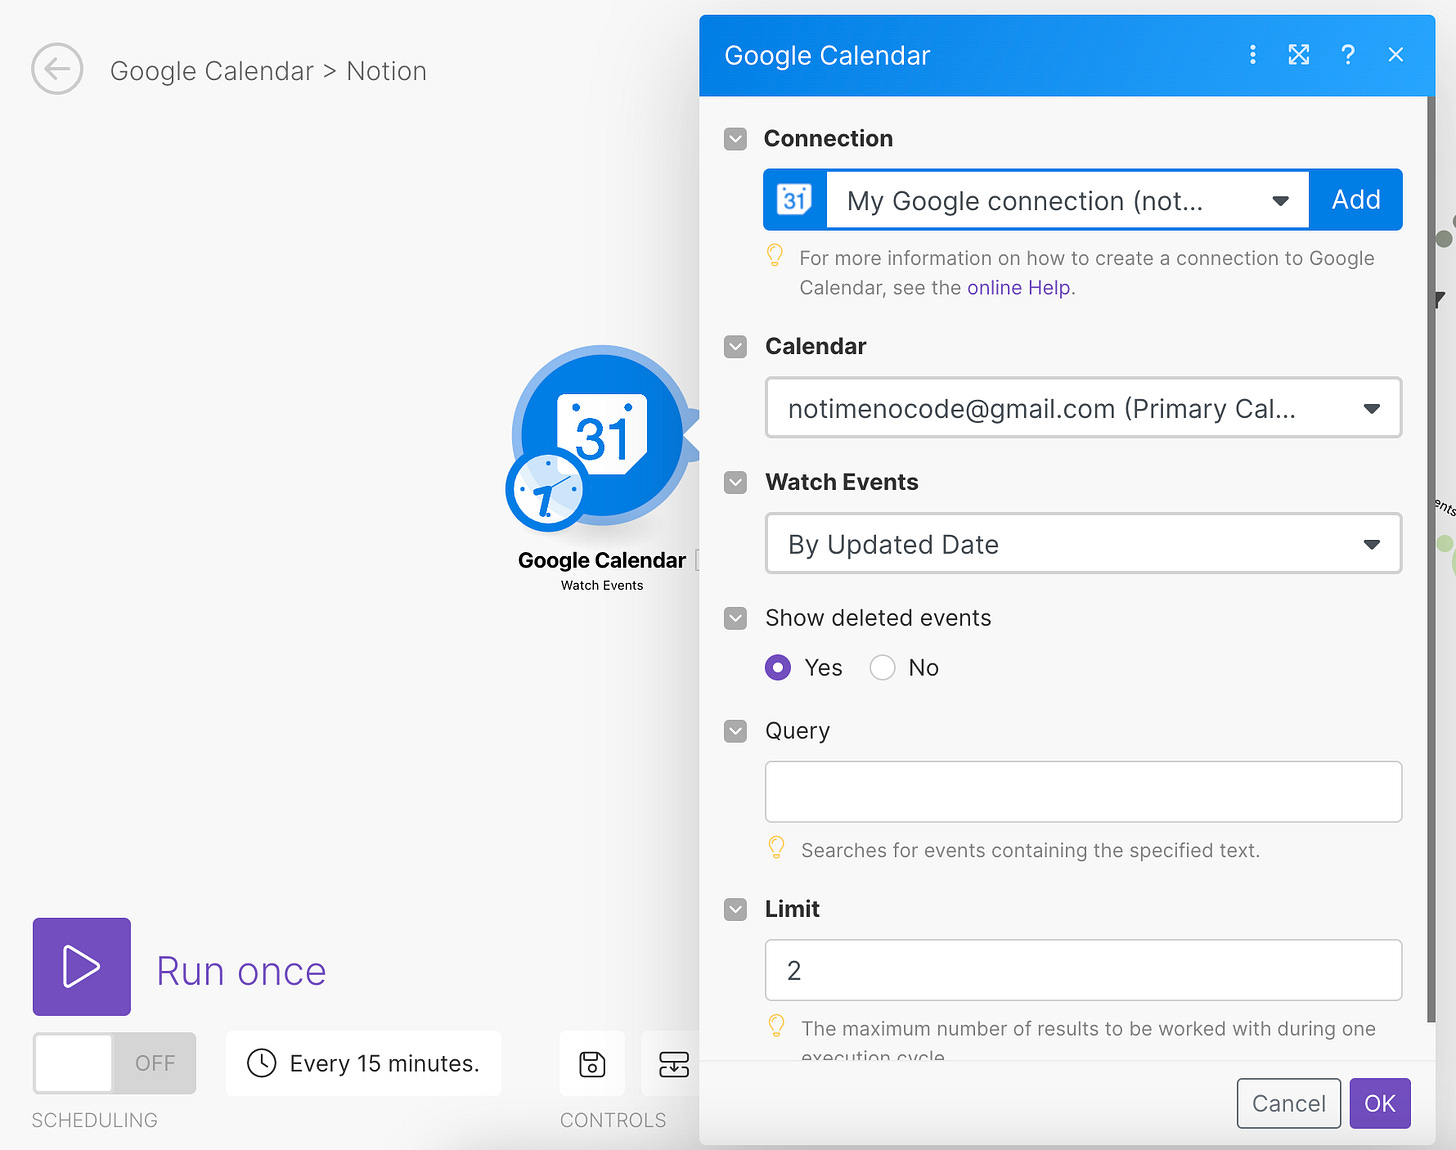
Step 3-2-1. 建立 Google Calendar - Watch Events 模組節點
我們在 Make 後台再新增一個新的 Scenario 後,新增 Google Calendar - Watch Events 的模組節點,並設定對應的 Calendar 日曆與相關資訊
- Watch Events: By Updated Date
- 將依據 Google Calendar 更新的日期進行判斷存取變動行程資料 - Show deleted events: Yes
- 請選擇 Yes,才可以讓系統偵測 Google 日曆的刪除事件 - Limit: 用於篩選一次處理的行程事件數量 (可依據需求調整)
Step 3-2-2. 建立 Notion - Search Objects 模組節點
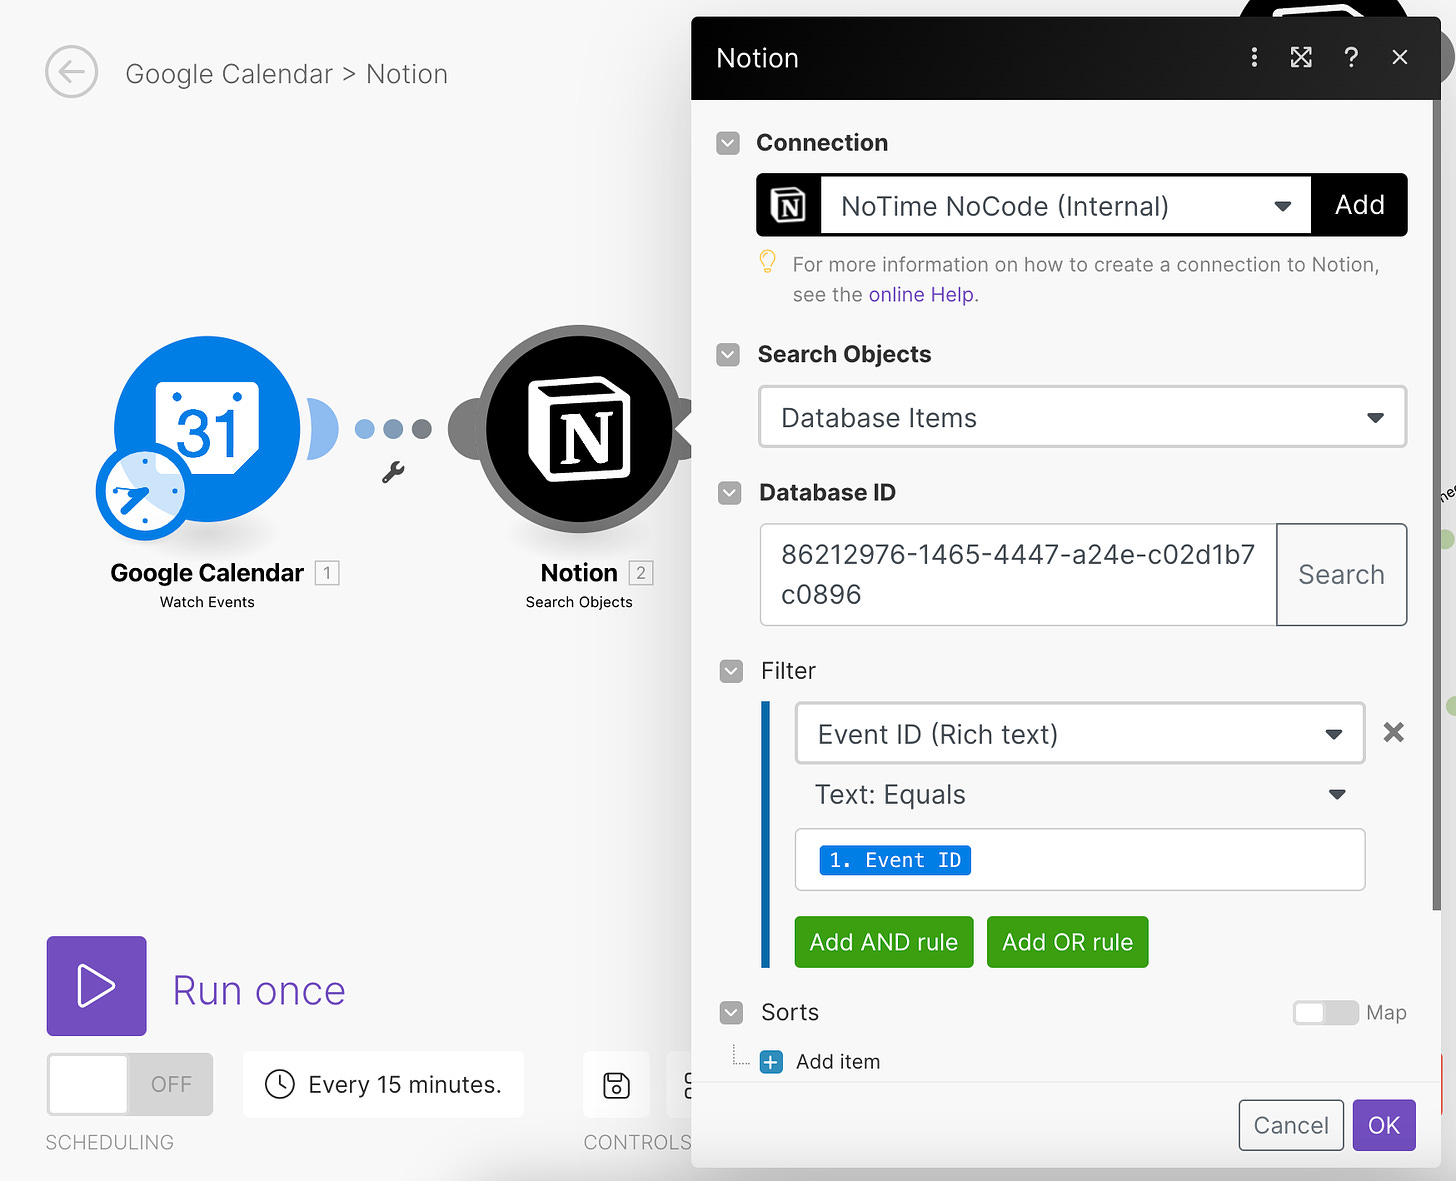
還記得我們在同步 Notion 資料庫項目到 Google Calendar 所建立的 Event ID 欄位嗎?
此步驟就是當我們透過 Notion 建立的 Google Calendar 行程有變動時,可以讓系統透過 Event ID 回到 Notion 資料庫中搜尋對應的行程。
當有搜尋到對應的行程時,就會接續執行後續的更新流程步驟; 當沒有搜尋到時,就會在 Notion 資料庫內建立一個新的項目。
所以我們設定好對應的 Notion Database ID 後,可以新增一個 Filter,並下拉選擇我們建立於 Notion 資料庫存放 Event ID 的欄位 (名稱將依每個人設定而異),並寫帶入前者 Google Calender 日曆節點模組的 Event ID
Step 3-2-3. 建立兩個 Router 模組節點並設定篩選條件
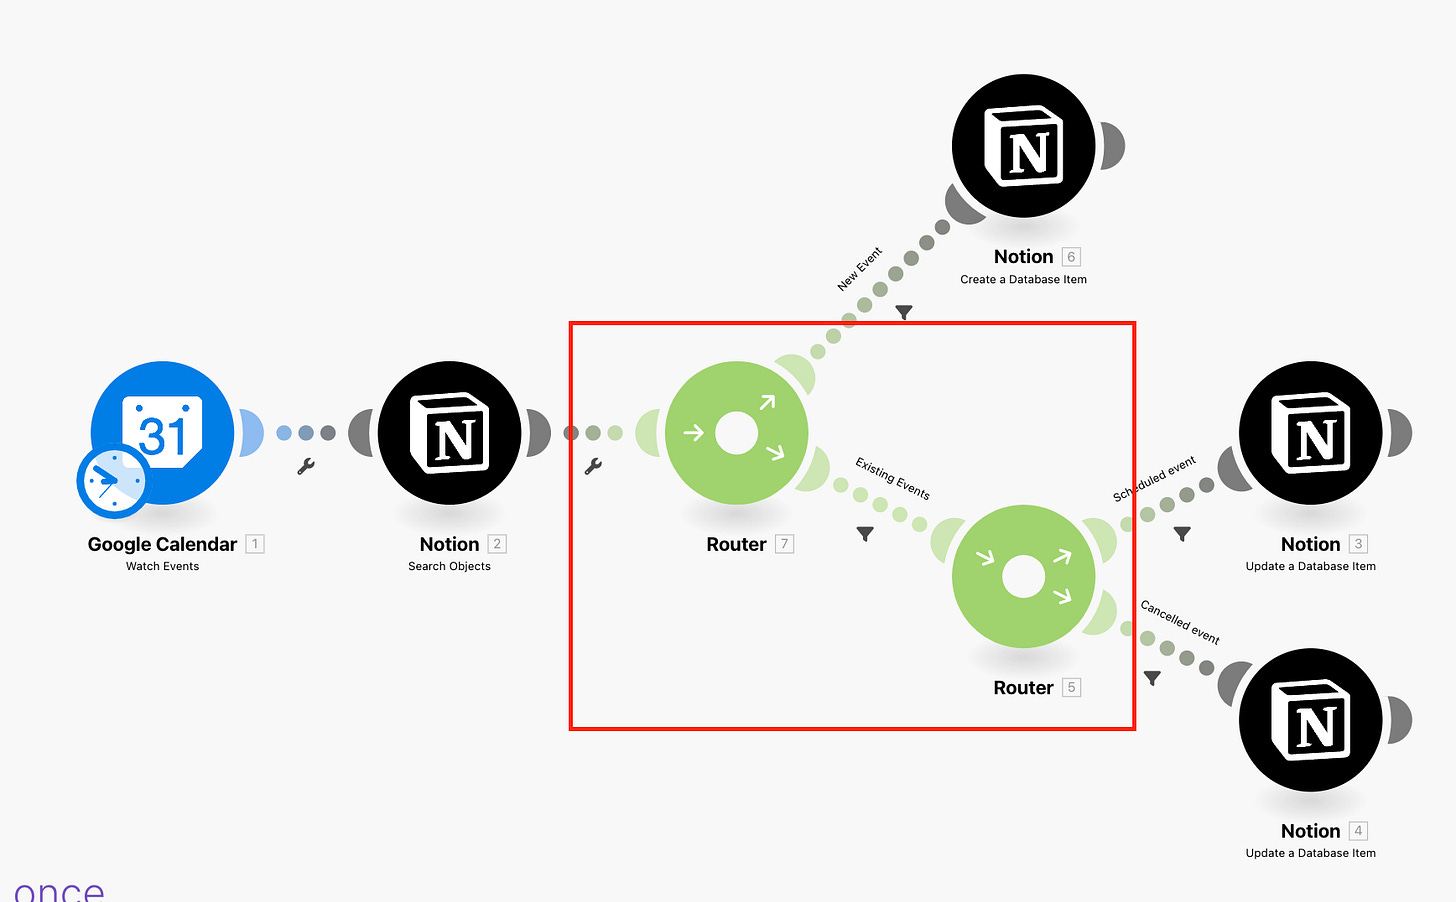
- New Event: 若發現在 Notion 資料庫內搜尋不到 Google Event ID 時
當前面 Notion 節點的 Total number of bundles (搜尋結果) 等於 0
Google Calendar 日曆節點的 Status 不是 cancelled

2. Existing Event: 若發現在 Notion 資料庫內可以搜尋到 Google Event ID 時
- 當前面 Notion 節點的 Total number of bundles (搜尋結果) 等於 1
- 表示有搜尋到 Notion 資料庫項目

2-1. Schedule Event: 當 Google Calendar 行程狀態不是 Cancel 時
- 當今天資料已經被篩選進入 Existing Events 後,需要再判斷一次行程狀態是否為 cancelled
- 如果不是,我們就可以更新後面 Notion 節點模組對應項目的相關內容

2-2. Cancelled Event: 當 Google Calendar 行程狀態是 Cancel 時
- 如果今天篩選進來的行程資料是 Cancelled 同樣會更新後面 Notion 節點模組對應項目的相關內容 (Status 改為 Cancelled)

Step 3-2-4. 建立 Notion - Create / Update a Database Item 節點模組
- New Event: 若發現在 Notion 資料庫內搜尋不到 Google Event ID 時
建立一個 Notion - Create a Database Item 的模組節點
將前面 Google Calendar 的相關資料寫入於新建立的 Notion 資料庫項目中
ps: 也記得要將 Google Calendar 的 Event ID 寫入唷,這樣之後更新才可以比對、搜尋到此項目

2. Existing Event:
2-1. Schedule Event: 當 Google Calendar 行程狀態不是 Cancel 時
- 建立一個 Notion - Update a Database Item 的模組節點
- 記得需將前面 Notion - Search Objects 模組節點的項目 Page ID 寫入此節點內,才可以更新原本資料唷
- 再依照讀者期望被更新的資料寫回對應的 Notion 項目欄位 (e.g. Title, Description … 等)
- ps: 也記得要將 Google Calendar 的 Event ID 寫入唷,這樣之後更新才可以比對、搜尋到此項目

2-2. Cancelled Event: 當 Google Calendar 行程狀態是 Cancel 時
- 建立一個 Notion - Update a Database Item 的模組節點
- 因為是行程的刪除,所以就不用更新 Title、Start / End Time … 等
- Event ID: 帶入空值 null
- Status: Cancelled (將依讀者在 Notion 中所設定的欄位選項而異)
- Description: 可以依照讀者需求更新內容

耶!再次恭喜!完成以上步驟後,可以測試看看!都沒問題的話,我們就完成 Google Calendar 日曆同步至 Notion 資料庫的自動化串接流程啦!
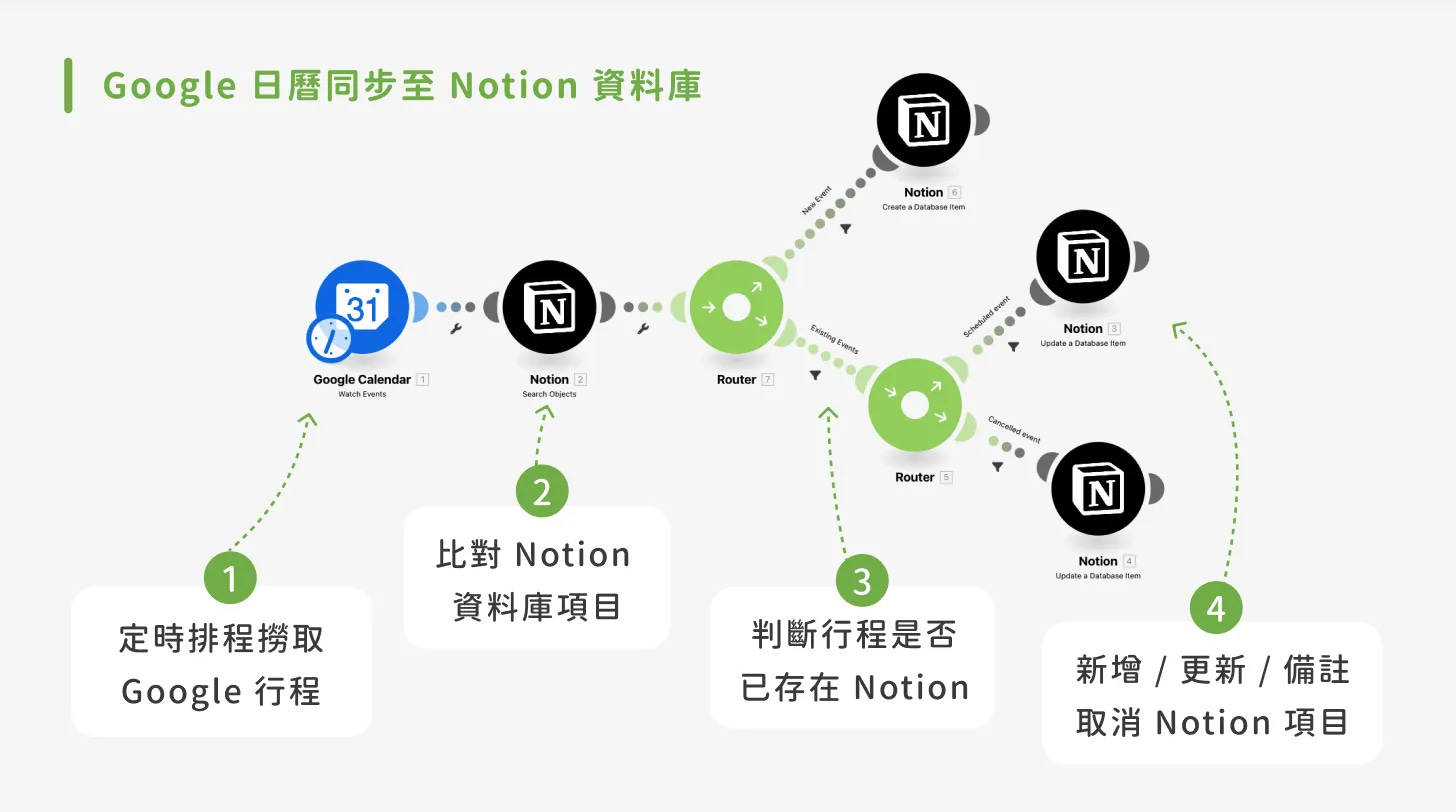
自動化雙向同步 Notion 與 Google Calendar 日曆已完成!
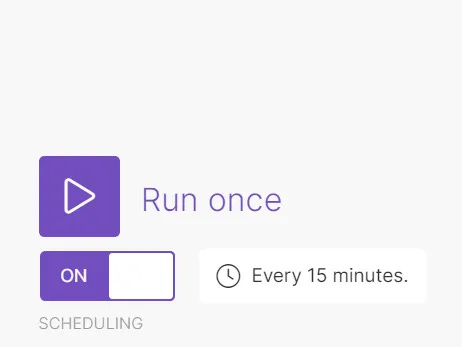
完成前面所有步驟設定後,就可以重新點擊 Run Once 所有流程
成功的話,你應該就可以看到所設定的 Notion 資料庫 & Google Calendar 日曆都會有對應的更新及邀請行程
最後都確認流程沒問題後,就可以開啟下面的開關,並開啟排程讓 Make 自動化處理雙向同步 Notion 與 Google Calendar 日曆囉~
*排程的時間可以依據讀者需求調整
🎉 如果你希望可以更快地實作此篇雙向同步 Notion 與 Google Calendar 日曆流程,我們也有提供此自動化流程的進階範本 ,方便你直接匯入 Make 自動化工具使用,就不用再一步步建立串接流程了!同時還額外加碼提供「Notion 資料庫範本」唷!有興趣的讀者可以前往我們 🔗此範本市集連結 選購套用!🎉
結論
透過以上幾個步驟的設定,不需要寫任何程式,就可以完成自動化雙向同步 Notion 與 Google Calendar 日曆的串接設定,之後也不用再手動於兩個平台各自建立行程與項目同步資訊了,只要在任何一個地方更新資訊,另外一邊的同步作業就交給 NoCode 自動化完成吧!
你喜歡這篇文章的內容嗎?如果你覺得我們每週分享的自動化情境與教學內容對你有幫助,歡迎透過此連結買杯咖啡支持我們吧!
或是有什麼其他情境想要了解的嗎?也歡迎留言或透過此表單連結許願給我們哦~
最後,如果操作過程中有任何問題,都可以透過 NoTime NoCode IG (@notime_nocode) 私訊我們,或來信 contact@notimenocode.com 聯繫詢問 :)
想知道更多 NoCode 工具術嗎?
歡迎追蹤我們 IG (@notime_nocode)!每週更新 NoCode 工作術 ✨ 我們將持續和大家分享 NoCode 自動化工具,以及如何善用它來解決繁瑣任務、成為省時達人!
#nocode #automation #工作效率 #工具分享 #notimenocode #make #nocode工作術 #notion #googlecalendar #行程同步


