Localization - 讓 App 支援不同語言 手把手教學
身為一個菜鳥工程師,將辛苦製作的 App 推向國際,多國語言是肯定要的。Let’s Go Go Go!
專案設定
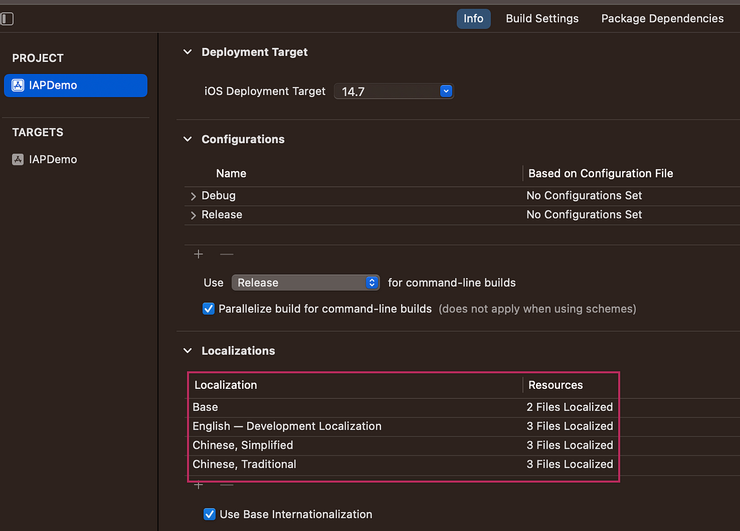
打開專案內的 Project -> Info -> Localizations 新增你想要增加的語言

增加完後會問你要添加的地方,例如 Main.storyboard 打勾的話,就會幫你把 storyboard 中所有有文字的地方變成一串 key = value 的形式,放進 main.strings 檔案,這個檔案會在你添加的語言資料夾內,所以每加一個語言,就會有一個專屬的資料夾


en 的語言資料夾內
storyboard 多國語文檔

Main 底下會長出語言的檔案

左圖可以看到,"2Gf-sf-0bs.text" = "Password"; 2Gf-sf-0bs這串文字其實是該 label 的 objectID,也是讓程式尋找對應的文字的 Key ,所以如果不知道這邊的文字代表畫面上哪個物件的時候,可以用 objectID 去 stroryboard 確認是哪個物件
在 stroryboard 上點選物件後,Document 欄位會有 objectID
這時候就會想到,阿如果我有些文字是用程式產生的呢?
程式中的文字多國語文檔
新增 Strings File,取名為 Localizable(請務必這樣取名,方便Xcode抓取),接著點選檔案右側的 Localization 將需要的語言打勾,就會幫你產出好幾個檔案


這邊的 Key 命名就看個人習慣,自己是將不同類型的文字前面加上label, btn, alert … 等作區分
記得程式內有使用到 String 文字的地方,就要透過 Key 去讀取對應的 String,才能達到多國語系顯示的目的
App Name 多國語文檔
別忘了幫 App 的大名跟著一起切換,這時候又要新增一個 Strings File,然後 key 為 "CFBundleDisplayName" 記得一定要取這個 Key 不然系統會抓不到

應用時間
// Localizable.string 內的格式
"alert_logInSuccess" = "LogIn Success";
"label_amountOfDiamondsText" = "%d 顆鑽石"; // %d 的地方可以傳入參數
// controller 讀取
let logInSuccessText = NSLocalizedString("PurchaseVC.Alert.logInSuccess", comment: "logIn Success")
let amountOfDiamondsText = NSLocalizedString("PurchaseVC.Label.amountOfDiamondsText", comment: "amountOfDiamondsText")
label.text = String.localizedStringWithFormat(amountOfDiamondsText, amountOfDiamonds) // print 1,000 顆鑽石
- 直接透過 Key 讀取
單純讀取文字的時候透過NSLocalizedString("文字對應的KEY", comment: "這邊可以為空,也可以寫這個文字的意思") - 讀取的內容需要傳入參數
遇到在數值前後的文字,可以在要轉換的文字中加上 %d,透過NSLocalizedString 取得文字,再透過String.localizedStringWithFormat(文字, 數值)就能完美讀取有數值的文字拉 - Enum 讀取字串
enum ProductID: String, CaseIterable {
    case diamonds100 = "Item01"
    case aiChatfor1Week = "Item06"

    var productName: String {
        switch self {
        case .diamonds100:
            return NSLocalizedString("diamonds100", comment: "diamonds100")
        case .aiChatfor1Week:
            return NSLocalizedString("aiChatfor1Week", comment: "aiChatfor1Week")
    }
}

// Localizable.string 內
"diamonds100" = "100 顆鑽石"
"aiChatfor1Week" = "AI 聊天/ 週";
小撇步
- enum 定義 Key 不容易打字錯誤
enum LocalizedKey: String {
case label_greeting, label_amountOfDiamondsText, btn_logIn, btn_logOut, alert_noRestore, alert_restoreSuccess, alert_cantBuy, alert_productName, alert_pleaseLogIn, alert_accountNPass
case label_psw, label_account, label_language, label_thrLogIn, label_welcome, label_server, label_buyDiamond, btn_restore, label_system
var str: String { self.rawValue }
}
- String Extension
extension String {

    var localizable: String {
        // 吃 LanguageManager 被賦予的 languageType
        if let manager = LanguageManager.shareInstance() as? LanguageManager,
           let path = Bundle.main.path(forResource: manager.languageType, ofType: "lproj"), let bundle = Bundle(path: path) {
            return NSLocalizedString(self, tableName: nil, bundle: bundle, value: "", comment: "")
        }
        return self
    }
}

// Localizable file
"memberCenter" = "會員中心";

// call
mylabel.text = "memberCenter".localizable
實作過後分享,Main.strings 的小缺點:
如果有新增的頁面或新增的 label or button,自己手動加 objectID 進去 Main.string 檔案後系統還是會吃不到,我的方式會最後才建立多國語言這個步驟,或是將要新增的文字直接加去 Localizable.strings 內,再拉 label or button 的 IBOutlet 進 ViewController,將文字指派給他
下一篇介紹如何包裝寫成一個完整的 LanguageManager 🤩
參考其他大大文章


